


3.4 ByteBuf
(1)创建
// 创建一个池化基于直接内存的 ByteBuf(指定初始容量为16)
ByteBuf bf = ByteBufAllocator.DEFAULT.buffer(16);
(2)直接内存、堆内存
// 创建池化基于堆内存的 ByteBuf
ByteBuf bf = ByteBufAllocator.DEFAULT.heapBuffer(16);

// 创建池化基于直接内存的 ByteBuf
ByteBuf bf = ByteBufAllocator.DEFAULT.directBuffer(16);
堆内存:创建和销毁的成本很高,但读写性能好(少一次内存复制)
直接内存:不在 jvm 管辖范围内,GC 压力小
(3)池化、非池化
池化:可以重用 ByteBuf,高并发场景下更节约内存,能较少内存溢出的可能
非池化:每次使用时都得创建新的 ByteBuf 实例,且在堆内存、直接内存不同的场景下影响不同
Netty 4.1 后非 Android 平台默认开启池化
(4)组成
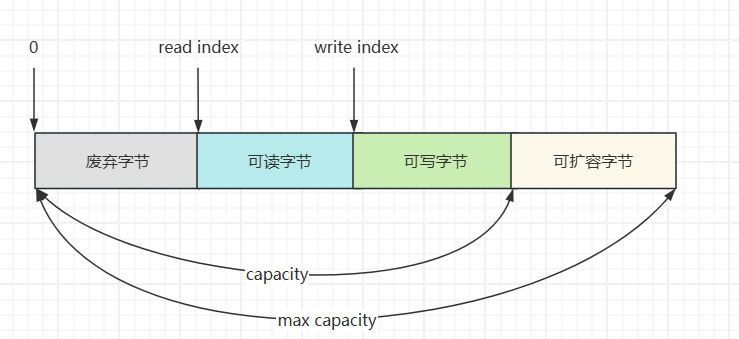
(5)写入
| 方法 | 参数说明 | 备注 |
|---|---|---|
| writeBoolean(boolean value) | 写入 boolean 值 | 一字节 01 表示 true、00 表示 false |
| writeByte(int value) | 写入 byte 值 | |
| writeShort(int value) | 写入 short 值 | |
| writeInt(int value) | 写入 int 值 | Big Endian,即 0x250,写入后 00 00 02 50(网络编程一般情况下默认使用大端写入) |
| writeIntLE(int value) | 写入 int 值 | Little Endian,即 0x250,写入后 50 02 00 00 |
| writeLong(long value) | 写入 long 值 | |
| writeChar(int value) | 写入 char 值 | |
| writeFloat(float value) | 写入 float 值 | |
| writeDouble(double value) | 写入 double 值 | |
| writeBytes(ByteBuf src) | 写入 netty 的 ByteBuf | |
| writeBytes(byte[] src) | 写入 byte[] | |
| writeBytes(ByteBuffer src) | 写入 nio 的 ByteBuffer | |
| int writeCharSequence(CharSequence sequence, Charset charset) | 写入字符串 |
演示:
package com.sw.netty._04;

import io.netty.buffer.ByteBuf;
import io.netty.buffer.ByteBufAllocator;

import static io.netty.buffer.ByteBufUtil.appendPrettyHexDump;
import static io.netty.util.internal.StringUtil.NEWLINE;

public class ByteBufTest {
    public static void main(String[] args) {
        ByteBuf bf = ByteBufAllocator.DEFAULT.buffer(10);
        bf.writeBytes(new byte[]{1, 2, 3, 4});
        log(bf);
        // read index:0 write index:4 capacity:10
        //         +-------------------------------------------------+
        //         |  0  1  2  3  4  5  6  7  8  9  a  b  c  d  e  f |
        // +--------+-------------------------------------------------+----------------+
        // |00000000| 01 02 03 04                                     |....            |
        // +--------+-------------------------------------------------+----------------+

        // 写入整型 10(4字节)
        bf.writeInt(10);
        log(bf);
        // read index:0 write index:8 capacity:10
        //         +-------------------------------------------------+
        //         |  0  1  2  3  4  5  6  7  8  9  a  b  c  d  e  f |
        // +--------+-------------------------------------------------+----------------+
        // |00000000| 01 02 03 04 00 00 00 0a                         |........        |
        // +--------+-------------------------------------------------+----------------+
    }

    private static void log(ByteBuf buffer) {
        int length = buffer.readableBytes();
        int rows = length / 16 + (length % 15 == 0 ? 0 : 1) + 4;
        StringBuilder buf = new StringBuilder(rows * 80 * 2)
                .append("read index:").append(buffer.readerIndex())
                .append(" write index:").append(buffer.writerIndex())
                .append(" capacity:").append(buffer.capacity())
                .append(NEWLINE);
        appendPrettyHexDump(buf, buffer);
        System.out.println(buf);
    }
}
(6)扩容
写入过程中,当 ByteBuf 容量不够时会进行扩容:
- 如何写入后数据大小未超过 512,则选择下一个 16 的整数倍进行扩容,如:写入后大小为 12 ,则扩容后 capacity 是 16
- 如果写入后数据大小超过 512,则选择下一个 2^n 进行扩容,如:写入后大小为 513,则扩容后 capacity 是 2^10=1024(2^9=512 已经不够了)
- 扩容不能超过 max capacity 最大容量
package com.sw.netty._04;

import io.netty.buffer.ByteBuf;
import io.netty.buffer.ByteBufAllocator;

import static io.netty.buffer.ByteBufUtil.appendPrettyHexDump;
import static io.netty.util.internal.StringUtil.NEWLINE;

public class ByteBufTest {
    public static void main(String[] args) {
        ByteBuf bf = ByteBufAllocator.DEFAULT.buffer(16);
        bf.writeBytes(new byte[]{1, 2, 3, 4});
        log(bf);
        // read index:0 write index:4 capacity:10
        //         +-------------------------------------------------+
        //         |  0  1  2  3  4  5  6  7  8  9  a  b  c  d  e  f |
        // +--------+-------------------------------------------------+----------------+
        // |00000000| 01 02 03 04                                     |....            |
        // +--------+-------------------------------------------------+----------------+

        // 写入整型 10(4字节)
        bf.writeInt(10);
        log(bf);
        // read index:0 write index:8 capacity:10
        //         +-------------------------------------------------+
        //         |  0  1  2  3  4  5  6  7  8  9  a  b  c  d  e  f |
        // +--------+-------------------------------------------------+----------------+
        // |00000000| 01 02 03 04 00 00 00 0a                         |........        |
        // +--------+-------------------------------------------------+----------------+

        // 继续写入(触发扩容)
        bf.writeBytes(new byte[]{1, 2, 3, 4, 5, 6, 7, 8, 9});
        log(bf);
        // read index:0 write index:17 capacity:64
        //         +-------------------------------------------------+
        //         |  0  1  2  3  4  5  6  7  8  9  a  b  c  d  e  f |
        // +--------+-------------------------------------------------+----------------+
        // |00000000| 01 02 03 04 00 00 00 0a 01 02 03 04 05 06 07 08 |................|
        // |00000010| 09                                              |.               |
        // +--------+-------------------------------------------------+----------------+
    }

    private static void log(ByteBuf buffer) {
        int length = buffer.readableBytes();
        int rows = length / 16 + (length % 15 == 0 ? 0 : 1) + 4;
        StringBuilder buf = new StringBuilder(rows * 80 * 2)
                .append("read index:").append(buffer.readerIndex())
                .append(" write index:").append(buffer.writerIndex())
                .append(" capacity:").append(buffer.capacity())
                .append(NEWLINE);
        appendPrettyHexDump(buf, buffer);
        System.out.println(buf);
    }
}
(7)读取
// 读取一个字节
System.out.println(buffer.readByte());

// 重复读取
// 1. 做标记
buffer.markReaderIndex();
System.out.println(buffer.readInt());

// 2. 重置到标记位置
buffer.resetReaderIndex();
System.out.println(buffer.readInt());注:io 读取操作类似于水流出水管,ByteBuf 提供的 getXxx() 方法也可以重复读取,且不会改变 read index
(8)retain、release
Netty 中使用了引用计数法来控制回收内存,每个 ByteBuf 都实现了 ReferenceCounted 接口
- 每个 ByteBuf 对象的初始计数为 1
- release 计数器减一
- retain 计数器加一,调用者调用了 retain 方法时,在未使用完之前,即使其他 handler 调用了 release 方法。内存也不会释放,因为引用计数器此时不为 0
- 当引用计数器为 0 时,底层内存会被回收(即使 ByteBuf 对象还存在,释放之后便不能再正常使用)
内存释放规则:谁最后一个使用,谁负责释放
入站处理规则:
- 原始 ByteBuf 不做处理,调用 ctx.fireChannelRead(msg) 向后续的 handler 传递,此时无须 release
- ByteBuf 被转换为其他 Java 对象时,ByteBuf 对象必须 release 处理(在调用链中传递的是转换后的对象,或者说在这个 handler 中转换了,也使用完了,无需再向后传递)
- 如果不需要再向后传递,必须 release
- 传递失败时,需要在 flnally 中 release
- 如果 msg 一直传递到了 tail,则由 tail 负责 release
出站处理规则:
- 出站 msg 最终会以 ByteBuf 的形式输出,会一直传递到 head,由 head 负责 release
异常处理规则:
- ByteBuf 在 pipeline 中出现异常时,必须 release,即申请的资源需要关闭/归还/释放
(8)slice 切片
对原始 ByteBuf 进行切片操作,可以生成多个 ByteBuf,切片时不会发生内存复制,还是使用原 ByteBuf 的内存(零拷贝),但生成的 ByteBuf 各自独立维护读指针、写指针
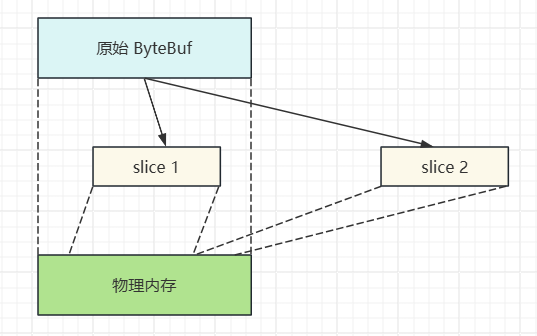
注:
- 切片后的 ByteBuf 的 max capacity 固定为切片区间(read index, write index)的大小,且不能追加写入新的内容
- 切片后的 ByteBuf 如果内容发生了变化,原始 ByteBuf 的内容也会随之变化(底层使用了同一块内存)
package com.sw.netty._04;

import io.netty.buffer.ByteBuf;
import io.netty.buffer.ByteBufAllocator;

import static utils.ByteBufferUtil.log;

public class ByteBufSliceTest {
    public static void main(String[] args) {
        ByteBuf bf = ByteBufAllocator.DEFAULT.buffer(16);
        bf.writeBytes(new byte[]{'0', '1', '2', '3', '4', '5', '6', '7', '8', '9', 'a', 'b', 'd', 'c', 'd', 'e', 'f'});
        log(bf);
        // read index:0 write index:17 capacity:64
        //         +-------------------------------------------------+
        //         |  0  1  2  3  4  5  6  7  8  9  a  b  c  d  e  f |
        // +--------+-------------------------------------------------+----------------+
        // |00000000| 30 31 32 33 34 35 36 37 38 39 61 62 64 63 64 65 |0123456789abdcde|
        // |00000010| 66                                              |f               |
        // +--------+-------------------------------------------------+----------------+

        // 切片(切片过程中不会发生数据的复制)
        ByteBuf bf1 = bf.slice(0, 5);
        log(bf1);
        // read index:0 write index:5 capacity:5
        //         +-------------------------------------------------+
        //         |  0  1  2  3  4  5  6  7  8  9  a  b  c  d  e  f |
        // +--------+-------------------------------------------------+----------------+
        // |00000000| 30 31 32 33 34                                  |01234           |
        // +--------+-------------------------------------------------+----------------+
        bf1.retain();

        ByteBuf bf2 = bf.slice(5, 5);
        log(bf2);
        // read index:0 write index:5 capacity:5
        //         +-------------------------------------------------+
        //         |  0  1  2  3  4  5  6  7  8  9  a  b  c  d  e  f |
        // +--------+-------------------------------------------------+----------------+
        // |00000000| 35 36 37 38 39                                  |56789           |
        // +--------+-------------------------------------------------+----------------+

        // 释放内存
        bf.release();

        System.out.println("ByteBuf 内存已释放");

        // 如果后续还要使用,需要显式 retain,防止计数器为0,内存被释放
        log(bf);
    }
}
(10)duplicate
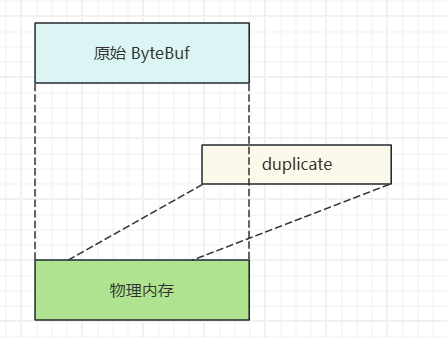
截取原始 ByteBuf 的所有内容(零拷贝),没有 max capacity 限制,且独立维护读写指针
(11)CompositeByteBuf
将多个 ByteBuf 合并为一个逻辑上的 ByteBuf(零拷贝),该方法在内部维护了一个 Component 数组,每个 Component 维护一个 ByteBuf,代表整体中的某一段数据
package com.sw.netty._04;

import io.netty.buffer.ByteBuf;
import io.netty.buffer.ByteBufAllocator;
import io.netty.buffer.CompositeByteBuf;

import static utils.ByteBufferUtil.log;

public class ByteBufCompositeTest {
    public static void main(String[] args) {
        ByteBuf bf = ByteBufAllocator.DEFAULT.buffer();
        bf.writeBytes(new byte[]{'0', '1', '2', '3', '4', '5'});

        ByteBuf bf1 = ByteBufAllocator.DEFAULT.buffer();
        bf1.writeBytes(new byte[]{'6', '7', '8', '9', 'a'});

        // 合并 ByteBuf
        // 方式一:(业务场景复杂,数据量大时,会产生很多io操作,不推荐)
        // ByteBuf bf2 = ByteBufAllocator.DEFAULT.buffer();
        // bf2.writeBytes(bf).writeBytes(bf1);
        // log(bf2);

        // 方式二:(可以避免频繁的数据拷贝操作)
        CompositeByteBuf bf2 = ByteBufAllocator.DEFAULT.compositeBuffer();
        // 通过 increaseWriteIndex 参数调整写入指针,不然合并不进去
        bf2.addComponents(true, bf, bf1);
        log(bf2);
        // read index:0 write index:11 capacity:11
        //         +-------------------------------------------------+
        //         |  0  1  2  3  4  5  6  7  8  9  a  b  c  d  e  f |
        // +--------+-------------------------------------------------+----------------+
        // |00000000| 30 31 32 33 34 35 36 37 38 39 61                |0123456789a     |
        // +--------+-------------------------------------------------+----------------+
    }
}
(13)Unpooled
Unpooled 是一个工具类,提供非池化 ByteBuf 的创建、组合、复制(零拷贝)等操作
package com.sw.netty._04;

import io.netty.buffer.ByteBuf;
import io.netty.buffer.ByteBufAllocator;
import io.netty.buffer.Unpooled;

import static utils.ByteBufferUtil.log;

public class ByteBufUnpooledTest {
    public static void main(String[] args) {
        ByteBuf bf = ByteBufAllocator.DEFAULT.buffer(4);
        bf.writeBytes(new byte[]{1, 2, 3, 4});
        ByteBuf bf1 = ByteBufAllocator.DEFAULT.buffer(4);
        bf.writeBytes(new byte[]{5, 6, 7, 8});

        // 当包装多个 ByteBuf 时,底层使用 CompositeByteBuf
        ByteBuf bf2 = Unpooled.wrappedBuffer(bf, bf1);
        System.out.println(bf2.getClass()); // class io.netty.buffer.CompositeByteBuf
        log(bf2);
        // read index:0 write index:8 capacity:8
        //         +-------------------------------------------------+
        //         |  0  1  2  3  4  5  6  7  8  9  a  b  c  d  e  f |
        // +--------+-------------------------------------------------+----------------+
        // |00000000| 01 02 03 04 05 06 07 08                         |........        |
        // +--------+-------------------------------------------------+----------------+

        // 普通 byte 数组同理
        ByteBuf bf3 = Unpooled.wrappedBuffer(new byte[]{'a', 'b'}, new byte[]{'c', 'd'});
        System.out.println(bf3.getClass()); // class io.netty.buffer.CompositeByteBuf
        log(bf3);
        // read index:0 write index:4 capacity:4
        //         +-------------------------------------------------+
        //         |  0  1  2  3  4  5  6  7  8  9  a  b  c  d  e  f |
        // +--------+-------------------------------------------------+----------------+
        // |00000000| 61 62 63 64                                     |abcd            |
        // +--------+-------------------------------------------------+----------------+
    }
}
(14)ByteBuf 优势
- 池化可重用,节约内存,在一定程度上减少内存溢出的可能
- 读写指针分离,不需要像 ByteBuffer 一样显式切换读写模式
- 自动扩容
- 支持链式调用
- slice、duplicate、CompositeByteBuf 等使用零拷贝,减少内存的复制


评论 (0)