
搜索到
31
篇与
的结果
-
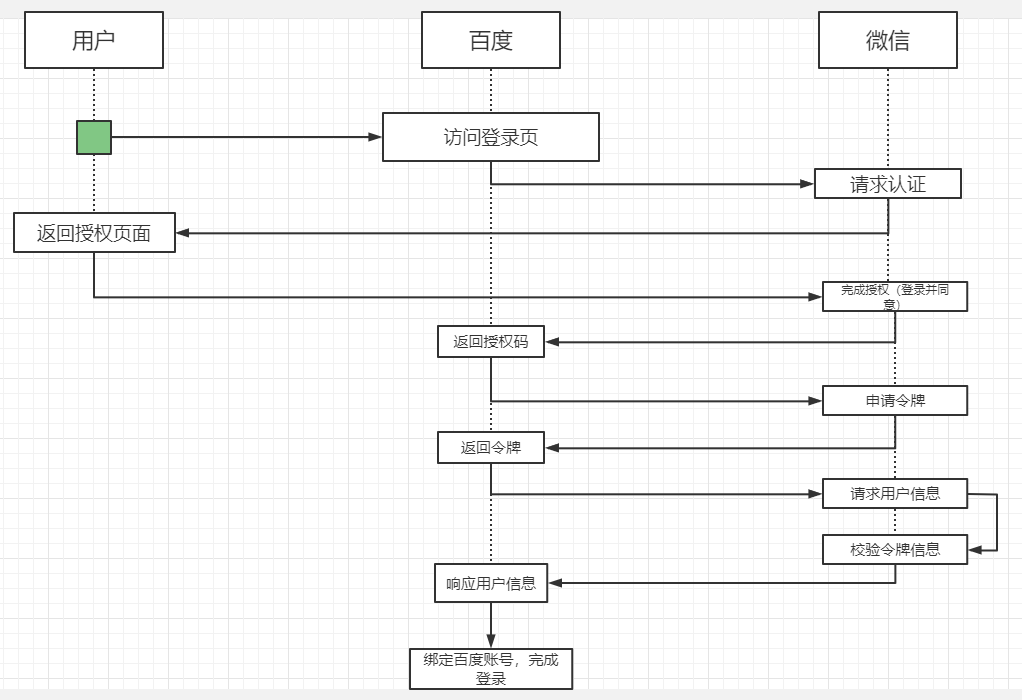
 Spring Cloud OAuth2.0 一、介绍1. 概念OAuth开放授权是一个开放标准,允许用户授权第三方应用访问存储在另外的服务提供者上的信息,而不需要将用户名和密码提供给第三方应用或分享数据的内容,OAuth2.0是OAuth协议的延续版本,不向下兼容OAuth1.0.2. 流程示例允许将认证和授权的过程交由一个独立的第三方来进行担保,OAuth协议用来定义如何让第三方的担保有效且双方可信,以登录百度账号为例:官方示意图:OAuth2.0包含以下几个角色:客户端(示例中的浏览器、微信客户端)本身不存储资源,需要通过资源拥有者的授权去请求资源服务器的资源资源拥有者(示例中的用户)通常是用户,也可以是应用程序,即该资源的拥有者授权服务器(也称认证服务器)(示例中的微信)用于服务提供者对资源资源拥有者的身份进行认证,对访问资源进行授权,认证成功后会给客户端发放令牌(access_token),作为客户端访问资源服务器的凭证资源服务器(示例中的百度、微信)存储资源的服务器,示例中,微信通过OAuth协议让百度可以访问自己存储的用户信息,而百度则通过该协议让用户可以访问自己受保护的资源3. 补充clientDetails(client_id):客户信息,代表百度在微信中的唯一索引secret:密钥,百度获取微信信息时需要提供的一个加密字段scope:授权作用域百度可以获取到的微信的信息范围,如:登录范围的凭证无法获取用户信息范围的内容access_token:访问令牌,百度获取微信用户信息的凭证grant_type:授权类型,authorization_code(授权码模式), password(密码模式), client_credentials(客户端模式), implicit(简易模式、隐式授权), refresh_token(刷新令牌)userDetails(user_id):授权用户标识,示例中代表用户的微信号二、Demo实现OAuth2的服务包含授权服务(Authorization Server)和资源服务(Resource Server)。授权服务包含对接入端以及登入用户的合法性进行验证并颁发token等功能,对令牌的请求断点由SpringMVC控制器进行实现AuthorizationEndPoint服务用于认证请求,默认url:/oauth/authorizeTokenEndPoint用于访问令牌的请求,默认url:/oauth/tokenOAuth2AuthenticaionProcessingFilter用于对请求给出的身份令牌进行解析健全大致业务流程:客户请求授权服务器申请access_token客户携带申请到的access_token访问资源服务器中的资源信息资源服务器将检验access_token的合法性,验证合法后返回对应的资源信息1. 父工程搭建pom.xml<?xml version="1.0" encoding="UTF-8"?> <project xmlns="http://maven.apache.org/POM/4.0.0" xmlns:xsi="http://www.w3.org/2001/XMLSchema-instance" xsi:schemaLocation="http://maven.apache.org/POM/4.0.0 http://maven.apache.org/xsd/maven-4.0.0.xsd"> <modelVersion>4.0.0</modelVersion> <modules> <module>OAuth-Server</module> <module>OAuth-User</module> </modules> <parent> <groupId>org.springframework.boot</groupId> <artifactId>spring-boot-starter-parent</artifactId> <version>2.2.5.RELEASE</version> <relativePath/> </parent> <groupId>com.sw</groupId> <artifactId>Spring-Cloud-OAuth2</artifactId> <version>1.0.0-SNAPSHOT</version> <packaging>pom</packaging> <properties> <java.version>1.8</java.version> <project.build.sourceEncoding>UTF-8</project.build.sourceEncoding> <springboot.version>2.2.5.RELEASE</springboot.version> </properties> <dependencyManagement> <dependencies> <dependency> <groupId>org.springframework.boot</groupId> <artifactId>spring-boot-starter-web</artifactId> <version>${springboot.version}</version> </dependency> <dependency> <groupId>org.springframework.cloud</groupId> <artifactId>spring-cloud-starter-security</artifactId> <version>${springboot.version}</version> </dependency> <dependency> <groupId>org.springframework.cloud</groupId> <artifactId>spring-cloud-starter-oauth2</artifactId> <version>${springboot.version}</version> </dependency> <dependency> <groupId>org.springframework.security</groupId> <artifactId>spring-security-jwt</artifactId> <version>1.0.9.RELEASE</version> </dependency> <dependency> <groupId>org.springframework.boot</groupId> <artifactId>spring-boot-starter-data-redis</artifactId> <version>${springboot.version}</version> </dependency> <dependency> <groupId>org.springframework.boot</groupId> <artifactId>spring-boot-starter-actuator</artifactId> <version>${springboot.version}</version> </dependency> <dependency> <groupId>javax.interceptor</groupId> <artifactId>javax.interceptor-api</artifactId> <version>1.2.2</version> </dependency> <dependency> <groupId>mysql</groupId> <artifactId>mysql-connector-java</artifactId> <scope>8.0.18</scope> </dependency> <dependency> <groupId>org.projectlombok</groupId> <artifactId>lombok</artifactId> <version>1.18.20</version> </dependency> </dependencies> </dependencyManagement> </project>2. 授权服务pom.xml<?xml version="1.0" encoding="UTF-8"?> <project xmlns="http://maven.apache.org/POM/4.0.0" xmlns:xsi="http://www.w3.org/2001/XMLSchema-instance" xsi:schemaLocation="http://maven.apache.org/POM/4.0.0 http://maven.apache.org/xsd/maven-4.0.0.xsd"> <parent> <artifactId>Spring-Cloud-OAuth2</artifactId> <groupId>com.sw</groupId> <version>1.0.0-SNAPSHOT</version> </parent> <modelVersion>4.0.0</modelVersion> <artifactId>OAuth-Server</artifactId> <dependencies> <dependency> <groupId>org.springframework.boot</groupId> <artifactId>spring-boot-starter-web</artifactId> </dependency> <dependency> <groupId>org.springframework.cloud</groupId> <artifactId>spring-cloud-starter-security</artifactId> </dependency> <dependency> <groupId>org.springframework.cloud</groupId> <artifactId>spring-cloud-starter-oauth2</artifactId> </dependency> <dependency> <groupId>org.springframework.security</groupId> <artifactId>spring-security-jwt</artifactId> </dependency> </dependencies> </project>主启动类开启 @EnableAuthorizationServer 注解package com.sw.oauth.server; import org.springframework.boot.SpringApplication; import org.springframework.boot.autoconfigure.SpringBootApplication; import org.springframework.security.oauth2.config.annotation.web.configuration.EnableAuthorizationServer; /** * @author suaxi * @date 2022/2/14 22:01 */ @SpringBootApplication @EnableAuthorizationServer public class OAuthServerApplication { public static void main(String[] args) { SpringApplication.run(OAuthServerApplication.class, args); } } application.yamserver: port: 8088 spring: application: name: OAuth-Server配置AuthorizationConfigpackage com.sw.oauth.server.config; import org.springframework.beans.factory.annotation.Autowired; import org.springframework.context.annotation.Bean; import org.springframework.context.annotation.Configuration; import org.springframework.http.HttpMethod; import org.springframework.security.authentication.AuthenticationManager; import org.springframework.security.core.userdetails.UserDetailsService; import org.springframework.security.crypto.bcrypt.BCryptPasswordEncoder; import org.springframework.security.oauth2.config.annotation.configurers.ClientDetailsServiceConfigurer; import org.springframework.security.oauth2.config.annotation.web.configuration.AuthorizationServerConfigurerAdapter; import org.springframework.security.oauth2.config.annotation.web.configurers.AuthorizationServerEndpointsConfigurer; import org.springframework.security.oauth2.config.annotation.web.configurers.AuthorizationServerSecurityConfigurer; import org.springframework.security.oauth2.provider.ClientDetailsService; import org.springframework.security.oauth2.provider.code.AuthorizationCodeServices; import org.springframework.security.oauth2.provider.code.InMemoryAuthorizationCodeServices; import org.springframework.security.oauth2.provider.token.AuthorizationServerTokenServices; import org.springframework.security.oauth2.provider.token.DefaultTokenServices; import org.springframework.security.oauth2.provider.token.TokenStore; /** * @author suaxi * @date 2022/2/14 22:11 */ @Configuration public class AuthorizationConfig extends AuthorizationServerConfigurerAdapter { @Autowired private AuthorizationCodeServices authorizationCodeServices; @Autowired private AuthenticationManager authenticationManager; @Autowired private UserDetailsService userDetailsService; @Autowired private TokenStore tokenStore; @Autowired private ClientDetailsService clientDetailsService; /** * 3.令牌端点安全约束 * @param security * @throws Exception */ @Override public void configure(AuthorizationServerSecurityConfigurer security) throws Exception { security //oauth/token_key 公开 .tokenKeyAccess("permitAll()") //oauth/check_token 公开 .checkTokenAccess("permitAll()") //表单认证,申请令牌 .allowFormAuthenticationForClients(); } /** * 1.客户端详情 * @param clients * @throws Exception */ @Override public void configure(ClientDetailsServiceConfigurer clients) throws Exception { clients.inMemory() //clientId .withClient("c1") //客户端密钥 .secret(new BCryptPasswordEncoder().encode("secret")) //资源列表 .resourceIds("admin") //授权方式 .authorizedGrantTypes("authorization_code", "password", "client_credentials", "implicit", "refresh_token") //授权范围 .scopes("all") //跳转到授权页面 .autoApprove(false) //回调地址 .redirectUris("https://wangchouchou.com"); } /** * 2.令牌服务 * @param endpoints * @throws Exception */ @Override public void configure(AuthorizationServerEndpointsConfigurer endpoints) throws Exception { endpoints //认证管理器 .authenticationManager(authenticationManager) //密码模式的用户信息管理 .userDetailsService(userDetailsService) //授权码服务 .authorizationCodeServices(authorizationCodeServices) //令牌管理服务 .tokenServices(tokenServices()) .allowedTokenEndpointRequestMethods(HttpMethod.POST); } public AuthorizationServerTokenServices tokenServices() { DefaultTokenServices tokenServices = new DefaultTokenServices(); //客户端详情 tokenServices.setClientDetailsService(clientDetailsService); //允许令牌自动刷新 tokenServices.setSupportRefreshToken(true); //令牌存储策略 tokenServices.setTokenStore(tokenStore); //默认令牌有效期 tokenServices.setAccessTokenValiditySeconds(3600); //刷新令牌有效期 tokenServices.setRefreshTokenValiditySeconds(86400); return tokenServices; } /** * 授权码模式的授权码如何存取 * @return */ @Bean public AuthorizationCodeServices authorizationCodeServices() { return new InMemoryAuthorizationCodeServices(); } } ClientDetailsServiceConfigurer:配置客户端详情(ClientDetails)服务,客户端详情信息在这里进行初始化,此处以内存配置方式为例clientId:用于标识客户的idsecret:客户端安全码scope:客户端访问范围,如果为空,则代表拥有全部的访问范围authorizedGrantTypes:授权类型authorities:客户端拥有的权限redirectUris:回调地址,授权服务会往该地址推送客户端相关的信息AuthorizationServerEndpointsConfigurer:配置令牌(token)的访问端点和令牌服务(tokenService),它可以完成令牌服务和令牌服务各个端点配置authenticationManager:认证管理器,选择password认证模式时就需要指定authenticationManager对象来进行鉴权userDetailsService:用户主体管理服务,如果设置这个属性,需要实现UserDetailsService接口,也可以设置全局域(GlobalAuthenticationManagerConfigurer),如果配置这种方式,refresh_token刷新令牌方式的授权流程中会多一个检查步骤,来确保当前令牌是否仍然有效authorizationCodeServices:用于授权码模式implicitGrantService:用于设置隐式授权模式的状态tokenGranter:如果设置该属性,授权全部交由自己掌控,并会忽略以上已设置的属性AuthorizationServerSecurityConfigurer:配置令牌端点的安全约束,可以通过pathMapping()方法配置端点url的链接地址,替换oauth默认的授权地址,也可以跟换spring security默认的授权页面/oauth/authorize:授权端点/oauth/token:令牌端点/oauth/confirm_access:用户确认授权提交端点/oauth/error:授权服务错误信息端点/oauth/check_token:检查令牌/oauth/token_key:使用jwt令牌需要用到的提供公有密钥的端点配置TokenConfigpackage com.sw.oauth.server.config; import org.springframework.context.annotation.Bean; import org.springframework.context.annotation.Configuration; import org.springframework.security.oauth2.provider.token.TokenStore; import org.springframework.security.oauth2.provider.token.store.InMemoryTokenStore; /** * @author suaxi * @date 2022/2/14 22:24 */ @Configuration public class TokenConfig { @Bean public TokenStore tokenStore() { return new InMemoryTokenStore(); } } 实现AuthorizationServerTokenService需要继承DefaultTokenService,该类可以修改令牌的格式和存储,默认情况下,在创建令牌时使用随机字符串来填充,这个类完成了令牌管理的大部分事情,唯一需要依赖的是spring容器中的TokenStore接口,以此来定制令牌持久化;TokenStore有一个默认实现(InMemoryTokenStore),这个实现类将令牌保存到内存中,除此之外还有其他几个默认实现类:InMemoryTokenStore:默认采用方式,可在单节点运行(即并发压力不大的情况下,并且在失败时不会进行备份),也可以在并发的时候进行管理,因为数据保存在内存中,不进行持久化存储,易于调试JdbcTokenStore:基于JDBC的实现类,令牌会被保存到关系型数据库中,可在不同的服务器之间共享令牌信息RedisTokenStore:与jdbc方式类似JwtTokenStore(JSON Web Token):可以将令牌信息全部编码整合进令牌本身,优点是后端可以不用进行存储操作,缺点是撤销一个已经授权的令牌很困难,所以通常用来处理生命周期较短的令牌以及撤销刷新令牌,另一个缺点是令牌较长,包含的用户凭证信息,它不保存任何数据在转换令牌值和授权信息方面与DefaultTokenServices扮演一样的角色配置WebSecurityConfigpackage com.sw.oauth.server.config; import org.springframework.context.annotation.Bean; import org.springframework.context.annotation.Configuration; import org.springframework.security.authentication.AuthenticationManager; import org.springframework.security.config.annotation.method.configuration.EnableGlobalMethodSecurity; import org.springframework.security.config.annotation.web.builders.HttpSecurity; import org.springframework.security.config.annotation.web.configuration.WebSecurityConfigurerAdapter; import org.springframework.security.core.userdetails.User; import org.springframework.security.core.userdetails.UserDetailsService; import org.springframework.security.crypto.bcrypt.BCryptPasswordEncoder; import org.springframework.security.crypto.password.PasswordEncoder; import org.springframework.security.provisioning.InMemoryUserDetailsManager; /** * @author suaxi * @date 2022/2/14 22:25 */ @Configuration @EnableGlobalMethodSecurity(prePostEnabled = true, securedEnabled = true) public class WebSecurityConfig extends WebSecurityConfigurerAdapter { @Bean public PasswordEncoder passwordEncoder() { return new BCryptPasswordEncoder(); } @Bean @Override public AuthenticationManager authenticationManagerBean() throws Exception{ return super.authenticationManager(); } @Bean @Override public UserDetailsService userDetailsService() { InMemoryUserDetailsManager inMemoryUserDetailsManager = new InMemoryUserDetailsManager( User.withUsername("admin").password(passwordEncoder().encode("123456")).authorities("manager, worker").build(), User.withUsername("manager").password(passwordEncoder().encode("123456")).authorities("manager").build(), User.withUsername("worker").password(passwordEncoder().encode("123456")).authorities("worker").build() ); return inMemoryUserDetailsManager; } @Override protected void configure(HttpSecurity http) throws Exception { http.csrf().disable() .authorizeRequests() .anyRequest().authenticated() .and() .formLogin(); } } 3. 授权服务流程测试1. 客户端模式client_credentails客户端向授权服务器发送自己的身份信息,请求access_tokenlocalhost:8088/oauth/token参数列表:grant_type:授权类型,需填写client_credentialsclient_id:客户端标识client_secret:客户端密钥这种方式最方便但也是最不安全的,代表了授权服务器对客户端完全信任,一般用于授权服务器对客户端完全信任的场景。2. 密码模式password(1)资源拥有者将用户名、密码发送给客户端(2)客户端用资源拥有者的用户名、密码向授权服务器申请令牌localhost:8088/oauth/token参数列表:grant_type:授权类型,需填写passwordclient_id:客户端标识client_secret:客户端密钥username:用户名password:密码这种方式用户会把用户名、密码直接泄露给客户端,代表了资源拥有者和授权服务器对客户端的绝对互信,一般用于内部开发客户端的场景3.简化模式(隐式模式)implicit(1)用户访问客户端,客户端向授权服务器申请授权(2)授权服务器引导用户进入授权页面,待用户同意授权(3)用户同意授权(4)用户同意授权后,授权服务器向客户端返回令牌测试流程:(1)客户端引导用户,直接访问授权服务器的授权地址http://localhost:8088/oauth/authorize?client_id=c1&response_type=token&scope=all&redirect_uri=https://wangchouchou.com(2)用户登录之后跳转至授权页面(3)用户点击approve同意授权,提交之后,页面跳转至redirect_uri地址并携带令牌信息(该地址需授权服务器提前配置)一般情况下,redirect_uri会配置成客户端自己的一个响应地址,这个地址收到授权服务器推送过来的令牌之后,可将它保存至本地,在需要调用资源服务时,再拿出来携带上访问资源服务器。该模式下,access_token是以#gragement的方式返回的,oauth三方的数据已经进行了隔离,一般用于没有服务端的第三方单页面应用,可在js中直接相应access_token。4. 授权码模式 authorization_code相较于简化模式的流程,授权码模式在第四步时,授权服务器先给客户端返回一个授权码(authorization_code),客户端拿到之后,再向授权服务器申请令牌测试流程:(1)用户申请access_token时访问:http://localhost:8088/oauth/authorize?client_id=c1&response_type=code&scope=all&redirect_uri=https://wangchouchou.com首先会跳转到授权服务器登录页,用户进行登录(2)登录完成之后,转到授权页面(3)点击同意授权之后,携带授权码重定向至redirect_uri(4)申请令牌参数列表:grant_type:授权类型,需填写authorization_codeclient_id:客户端标识client_secret:客户端密钥code:授权码(只能用一次)redirect_uri:重定向地址5. 刷新令牌当令牌超时后,可以通过refresh_token申请新的令牌(refresh_token随access_token一起申请到)参数列表:grant_type:授权类型,需填写refresh_tokenclient_id:客户端标识client_secret:客户端密钥refresh_token:刷新令牌6. 验证令牌参数列表:token:令牌4. 资源服务pom.xml<?xml version="1.0" encoding="UTF-8"?> <project xmlns="http://maven.apache.org/POM/4.0.0" xmlns:xsi="http://www.w3.org/2001/XMLSchema-instance" xsi:schemaLocation="http://maven.apache.org/POM/4.0.0 http://maven.apache.org/xsd/maven-4.0.0.xsd"> <parent> <artifactId>Spring-Cloud-OAuth2</artifactId> <groupId>com.sw</groupId> <version>1.0.0-SNAPSHOT</version> </parent> <modelVersion>4.0.0</modelVersion> <artifactId>OAuth-User</artifactId> <dependencies> <dependency> <groupId>org.springframework.boot</groupId> <artifactId>spring-boot-starter-web</artifactId> </dependency> <dependency> <groupId>org.springframework.cloud</groupId> <artifactId>spring-cloud-starter-security</artifactId> </dependency> <dependency> <groupId>org.springframework.cloud</groupId> <artifactId>spring-cloud-starter-oauth2</artifactId> </dependency> <dependency> <groupId>org.springframework.security</groupId> <artifactId>spring-security-jwt</artifactId> </dependency> </dependencies> </project>主启动类打开@EnableResourceServer注解,会自动增加一个OAuth2AuthenticationProcessingFilter的过滤器链package com.sw.oauth.user; import org.springframework.boot.SpringApplication; import org.springframework.boot.autoconfigure.SpringBootApplication; import org.springframework.security.oauth2.config.annotation.web.configuration.EnableResourceServer; /** * @author suaxi * @date 2022/2/14 22:08 */ @SpringBootApplication @EnableResourceServer public class OAuthUserApplication { public static void main(String[] args) { SpringApplication.run(OAuthUserApplication.class, args); } } application.ymlserver: port: 8089 spring: application: name: OAuth-User资源服务器核心配置Spring Security也提供了ResourceServerSecurityConfigurer适配器来协助完成资源服务器的配置ResourceServerSecurityConfigurer中主要包含:tokenServices:ResourceServerTokenServices类的实例,用来实现令牌服务,即如何验证令牌tokenStore:TokenStore类的实例,指定令牌如何访问,与tokenServices配置可选resourceId:资源服务器id(可选),一般情况下推荐设置并在授权服务中进行验证tokenExtractor:用于提取请求中的令牌HttpSecurity配置与Spring Security类似:authorizeRequests()方法验证请求antMatchers()方法匹配访问路径access()方法配置需要的权限ResourceServerConfig配置package com.sw.oauth.user.config; import org.springframework.beans.factory.annotation.Autowired; import org.springframework.context.annotation.Configuration; import org.springframework.security.config.annotation.web.builders.HttpSecurity; import org.springframework.security.config.http.SessionCreationPolicy; import org.springframework.security.oauth2.config.annotation.web.configuration.ResourceServerConfigurerAdapter; import org.springframework.security.oauth2.config.annotation.web.configurers.ResourceServerSecurityConfigurer; import org.springframework.security.oauth2.provider.token.RemoteTokenServices; import org.springframework.security.oauth2.provider.token.ResourceServerTokenServices; import org.springframework.security.oauth2.provider.token.TokenStore; /** * @author suaxi * @date 2022/2/15 22:36 */ @Configuration public class ResourceServerConfig extends ResourceServerConfigurerAdapter { private static final String RESOURCE_ADMIN = "admin"; @Autowired private TokenStore tokenStore; @Override public void configure(ResourceServerSecurityConfigurer resources) throws Exception { resources //资源ID .resourceId(RESOURCE_ADMIN) //使用远程服务验证令牌(使用JWT令牌时无需远程验证服务) .tokenServices(tokenServices()) .tokenStore(tokenStore) //无状态模式(无需管理session,此处只验证access_token) .stateless(true); } @Override public void configure(HttpSecurity http) throws Exception { http.authorizeRequests() .antMatchers("/admin/**") .access("#oauth2.hasAnyScope('all')") .and() .csrf().disable() .sessionManagement().sessionCreationPolicy(SessionCreationPolicy.STATELESS); } /** * access_token远程验证策略 * @return */ public ResourceServerTokenServices tokenServices() { RemoteTokenServices tokenServices = new RemoteTokenServices(); tokenServices.setCheckTokenEndpointUrl("http://localhost:8088/oauth/check_token"); tokenServices.setClientId("c1"); tokenServices.setClientSecret("secret"); return tokenServices; } } 需注意ResourceServerSecurityConfigurer的tokenServices()方法,设置了一个token的管理服务,其中,如果资源服务和授权服务在同一应用程序上,那可以使用DefaultTokenServices,就不用考虑实现所有必要接口一致性的问题,反之,则必须要保证有能够匹配授权服务提供的ResourceServerTokenServices,这个类知道如何对令牌进行解码。令牌解析方法:使用DefaultTokenServices在资源服务器本地配置令牌存储、解码、解析方式;使用RemoteTokenServices,资源服务器通过http请求来解码令牌,每次请求都需要请求授权服务器端点/oauth/check_token,同时还需要授权服务器将该端点暴露出来,以便资源服务器进行访问,在资源服务器配置中需注意:@Override public void configure(AuthorizationServerSecurityConfigurer security) throws Exception { security //oauth/token_key 公开 .tokenKeyAccess("permitAll()") //oauth/check_token 公开 .checkTokenAccess("permitAll()") //表单认证,申请令牌 .allowFormAuthenticationForClients(); }资源服务器WebSecurityConfig配置package com.sw.oauth.user.config; import org.springframework.context.annotation.Configuration; import org.springframework.security.config.annotation.web.builders.HttpSecurity; import org.springframework.security.config.annotation.web.configuration.WebSecurityConfigurerAdapter; /** * @author suaxi * @date 2022/2/15 22:52 */ @Configuration public class WebSecurityConfig extends WebSecurityConfigurerAdapter { @Override protected void configure(HttpSecurity http) throws Exception { http.csrf().disable() .authorizeRequests() .antMatchers("/admin/**") .hasAnyAuthority("admin") .anyRequest().authenticated(); } } controllerpackage com.sw.oauth.user.controller; import org.springframework.web.bind.annotation.GetMapping; import org.springframework.web.bind.annotation.RequestMapping; import org.springframework.web.bind.annotation.RestController; /** * @author suaxi * @date 2022/2/15 22:43 */ @RestController @RequestMapping("/admin") public class AdminController { @GetMapping("/test") public String test() { return "test"; } } 接口测试:直接访问:header携带令牌访问:在该测试过程中,资源服务器未配置TokenStore对象,它并不知道access_token的意义;需要使用RemoteTokenServices将令牌拿到授权服务器上进行验证才能得到客户信息,当请求量逐步增大之后,会加重系统的网络负担以及运行效率,而JWT令牌需解决以上提到的问题。三、 JWT令牌1. 概念JWT(JSON Web Token),是一个开放的行业标准(RFC 7519),它定义了一种简单的、自包含的协议格式,用于在通信双方传递json对象,传递的信息经过数字签名,可以被验证和信任,可以使用HMAC、RSA等算法。在OAuth中使用JWT,令牌本身就包含了客户的详细信息,资源服务器就不用再依赖授权服务器就可以完成令牌解析。官网:https://jwt.io/RFC 7519协议:https://datatracker.ietf.org/doc/rfc7519/优点基于json,方便解析自定义令牌内容,可扩展通过非对称加密算法及数字签名防止被篡改,安全性高资源服务器克不依赖于授权服务器完成令牌解析缺点:令牌较长,占用的空间过多令牌结构由Header.Payload.Signature三部分组成,中间由(.)分割Header:头部包括令牌的类型以及使用的hash算法(HMAC、SHA256、RSA){ "alg": "HS256", "typ": "JWT" }使用Base64编码之后得到JWT令牌的第一部分Payload:负载(Base64编码):存放有效信息,如:iss(签发者),exp(过期时间戳),sub(面向的用户)等,也可以自定义字段该部分不建议存放敏感信息,可以通过解码还原出原始内容。Signature:该部分防止JWT内容被篡改,使用Base64将前两部分编码,使用(.)连接组成字符串,最后使用header中声明的算法进行签名2. 配置JWT令牌服务1. 授权服务配置TokenConfig配置package com.sw.oauth.server.config; import org.springframework.context.annotation.Bean; import org.springframework.context.annotation.Configuration; import org.springframework.security.oauth2.provider.token.TokenStore; import org.springframework.security.oauth2.provider.token.store.InMemoryTokenStore; import org.springframework.security.oauth2.provider.token.store.JwtAccessTokenConverter; import org.springframework.security.oauth2.provider.token.store.JwtTokenStore; /** * @author suaxi * @date 2022/2/14 22:24 */ @Configuration public class TokenConfig { private static final String SIGN_KEY = "server"; // @Bean // public TokenStore tokenStore() { // return new InMemoryTokenStore(); // } @Bean public TokenStore tokenStore() { return new JwtTokenStore(accessTokenConverter()); } @Bean public JwtAccessTokenConverter accessTokenConverter() { JwtAccessTokenConverter accessTokenConverter = new JwtAccessTokenConverter(); accessTokenConverter.setSigningKey(SIGN_KEY); return accessTokenConverter; } } AuthorizationConfig配置@Autowired private JwtAccessTokenConverter accessTokenConverter; public AuthorizationServerTokenServices tokenServices() { DefaultTokenServices tokenServices = new DefaultTokenServices(); //客户端详情 tokenServices.setClientDetailsService(clientDetailsService); //允许令牌自动刷新 tokenServices.setSupportRefreshToken(true); //令牌存储策略 tokenServices.setTokenStore(tokenStore); //使用JWT令牌 tokenServices.setTokenEnhancer(accessTokenConverter); //默认令牌有效期 tokenServices.setAccessTokenValiditySeconds(3600); //刷新令牌有效期 tokenServices.setRefreshTokenValiditySeconds(86400); return tokenServices; }2. 测试申请令牌:验证令牌:3. 资源服务器配置将授权服务器中的TokenConfig拷贝至资源服务器config目录下在ResourceServerConfig中屏蔽ResourceServerTokenServices package com.sw.oauth.user.config; import org.springframework.beans.factory.annotation.Autowired; import org.springframework.context.annotation.Configuration; import org.springframework.security.config.annotation.web.builders.HttpSecurity; import org.springframework.security.config.http.SessionCreationPolicy; import org.springframework.security.oauth2.config.annotation.web.configuration.ResourceServerConfigurerAdapter; import org.springframework.security.oauth2.config.annotation.web.configurers.ResourceServerSecurityConfigurer; import org.springframework.security.oauth2.provider.token.RemoteTokenServices; import org.springframework.security.oauth2.provider.token.ResourceServerTokenServices; import org.springframework.security.oauth2.provider.token.TokenStore; /** * @author suaxi * @date 2022/2/15 22:36 */ @Configuration public class ResourceServerConfig extends ResourceServerConfigurerAdapter { private static final String RESOURCE_ADMIN = "admin"; @Autowired private TokenStore tokenStore; @Override public void configure(ResourceServerSecurityConfigurer resources) throws Exception { resources //资源ID .resourceId(RESOURCE_ADMIN) //使用远程服务验证令牌(使用JWT令牌时无需远程验证服务) // .tokenServices(tokenServices()) .tokenStore(tokenStore) //无状态模式(无需管理session,此处只验证access_token) .stateless(true); } @Override public void configure(HttpSecurity http) throws Exception { http.authorizeRequests() .antMatchers("/admin/**") .access("#oauth2.hasAnyScope('all')") .and() .csrf().disable() .sessionManagement().sessionCreationPolicy(SessionCreationPolicy.STATELESS); } /** * access_token远程验证策略 * @return */ // public ResourceServerTokenServices tokenServices() { // RemoteTokenServices tokenServices = new RemoteTokenServices(); // tokenServices.setCheckTokenEndpointUrl("http://localhost:8088/oauth/check_token"); // tokenServices.setClientId("c1"); // tokenServices.setClientSecret("secret"); // return tokenServices; // } } 4. 测试Github demo地址:https://github.com/suaxi/Spring-Cloud-OAuth2
 -
Seata分布式事务原理 1、TM开启分布式事务(TM向TC注册全局事务)2、按业务场景,编排数据库、服务等事务内的资源(RM向TC汇报资源准备状态)3、TM结束分布式事务,事务一阶段结束(TM通知TC提交/回滚)4、TC汇总事务信息,决定最终是提交还是回滚事务5、TC通知所有RM提交/回滚 资源,事务二阶段结束Seata提供了四个模式:AT、TCC、SAGA、XAAT模式两阶段提交协议的演变:一阶段:业务数据和回滚日志记录在同一个本地事务中提交,释放本地锁和连接资源二阶段:提交异步化(能快速完成);回滚通过一阶段的回滚日志进行反向补偿一阶段:在一阶段,seata会拦截“业务SQL”:1、解析SQL语义,找到“业务SQL”要更新的业务数据,在业务数据被更新前,将其保存为before image2、执行“业务SQL”更新业务数据,更新之后将业务数据保存为after image3、最后生成行锁以上操作全部在一个数据库事务内完成,保证了一阶段操作的原子性二阶段:1、成功提交二阶段正常执行的话,只需将一阶段保存的快照数据和行锁删除,即可完成数据清理,因为“业务SQl”在一阶段已经在提交至数据库2、事务回滚二阶段如果出现异常,需要事务回滚,seata就需要回滚一阶段已经执行的“业务SQL”,还原业务数据;回滚方式使用before image还原业务数据,在还原之前需要做校验脏写,对比数据库当前的业务数据和after image数据快照,如果两份数据完全一致,就说明没有脏写,执行还原操作,如果不一致,就需要转人工处理
-
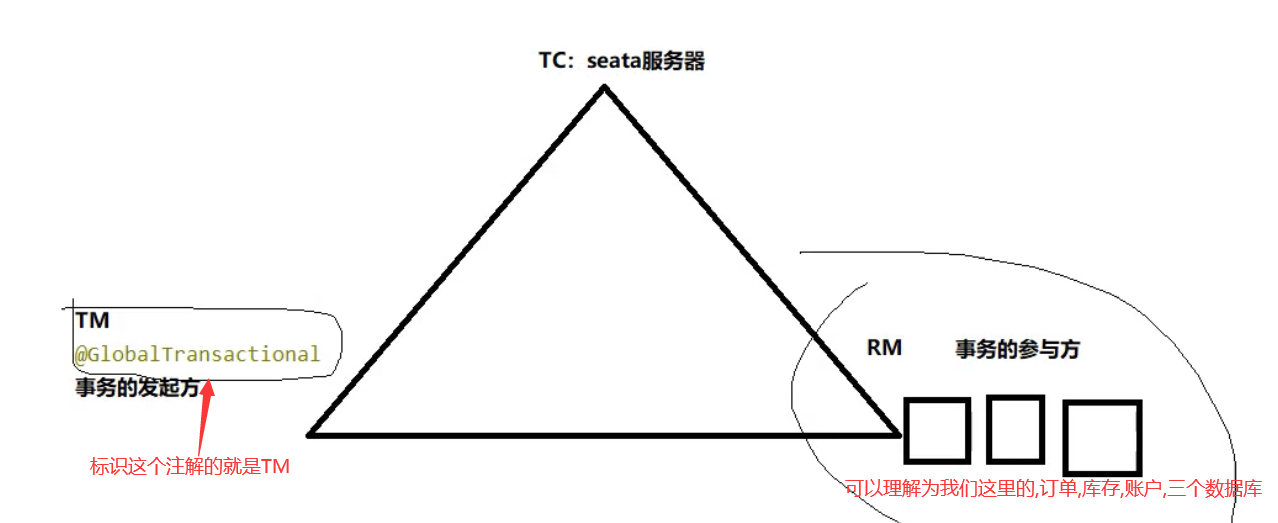
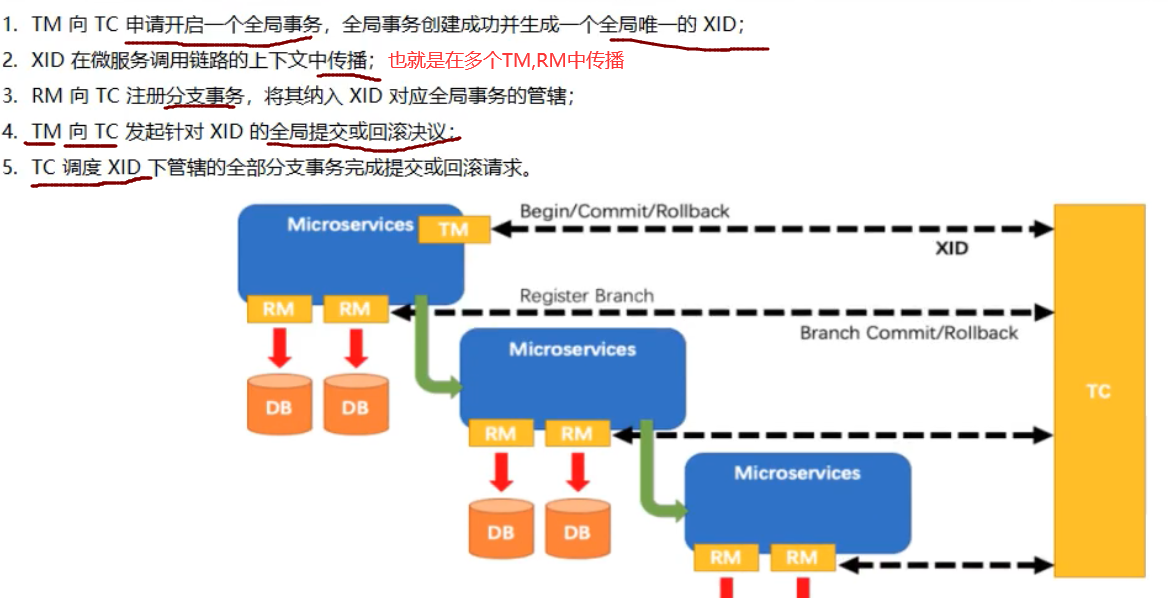
Seata seata是一个分布式的解决方案,致力于在微服务架构下提供高性能和简单易用的分布式微服务,官网:http://seata.io/zh-cn/一、三组概念TC 事务协调者:维护全局和分支事务的状态,驱动全局事务提交或回滚TM 事务管理器:定义全局事务的范围:开始、提交、回滚RM 资源管理器:管理分支事务处理的资源,与TC交谈以注册分支事务和报告分支事务的状态,并驱动分支事务提交或回滚二、安装GitHub地址:https://github.com/seata/seata(以Nacos 2.0、Seata 1.4.2为例)修改配置文件1、/conf/file.conf (注意与1.0之前的版本区分,1.0之后可以在yml文件中指定service配置)修改数据库模式(使用数据库存储事务信息)和数据源2、/conf/registry.conf3、mysql建表1、新建seata数据库2、运行mysql.sql注意:建表sql在/conf/REDME.md文件中,点击server出现存放sql的github地址:https://github.com/seata/seata/tree/develop/script/server4、启动先启动Nacos再启动Seata(bin/seata-server.bat)三、业务测试1、业务说明创建三个微服务:订单---库存---账户大致流程:当用户下单时,订单服务创建订单,远程调用库存服务扣减库存,再通过远程调用账户服务来扣减账户余额,最后在订单服务中修改订单状态为已完成。2、数据库建表创建三个数据库seata_order(订单),seata_storage(库存),seata_account(账户)创建对应的表-- t_order DROP TABLE IF EXISTS `t_order`; CREATE TABLE `t_order` ( `id` bigint(11) NOT NULL AUTO_INCREMENT, `user_id` bigint(11) NULL DEFAULT NULL COMMENT '用户id', `product_id` bigint(11) NULL DEFAULT NULL COMMENT '产品id', `count` int(11) NULL DEFAULT NULL COMMENT '数量', `money` decimal(11, 0) NULL DEFAULT NULL COMMENT '金额', `status` int(1) NULL DEFAULT NULL COMMENT '订单状态:0:创建中; 1:已完结', PRIMARY KEY (`id`) USING BTREE ) ENGINE = InnoDB AUTO_INCREMENT = 14 CHARACTER SET = utf8 COLLATE = utf8_general_ci ROW_FORMAT = Dynamic; -- t_storage DROP TABLE IF EXISTS `t_storage`; CREATE TABLE `t_storage` ( `id` bigint(11) NOT NULL AUTO_INCREMENT, `product_id` bigint(11) NULL DEFAULT NULL COMMENT '产品id', `total` int(11) NULL DEFAULT NULL COMMENT '总库存', `used` int(11) NULL DEFAULT NULL COMMENT '已用库存', `residue` int(11) NULL DEFAULT NULL COMMENT '剩余库存', PRIMARY KEY (`id`) USING BTREE ) ENGINE = InnoDB AUTO_INCREMENT = 2 CHARACTER SET = utf8 COLLATE = utf8_general_ci ROW_FORMAT = Dynamic; INSERT INTO `t_storage` VALUES (1, 1, 100, 0, 100); -- t_account DROP TABLE IF EXISTS `t_account`; CREATE TABLE `t_account` ( `id` bigint(11) NOT NULL AUTO_INCREMENT COMMENT 'id', `user_id` bigint(11) NULL DEFAULT NULL COMMENT '用户id', `total` decimal(10, 0) NULL DEFAULT NULL COMMENT '总额度', `used` decimal(10, 0) NULL DEFAULT NULL COMMENT '已用余额', `residue` decimal(10, 0) NULL DEFAULT 0 COMMENT '剩余可用额度', PRIMARY KEY (`id`) USING BTREE ) ENGINE = InnoDB AUTO_INCREMENT = 2 CHARACTER SET = utf8 COLLATE = utf8_general_ci ROW_FORMAT = Dynamic; INSERT INTO `t_account` VALUES (1, 1, 1000, 0, 1000);undo回滚日志表,三个库每个都需要创建一张回滚表,分别执行三次DROP TABLE IF EXISTS `undo_log`; CREATE TABLE `undo_log` ( `id` bigint(20) NOT NULL AUTO_INCREMENT, `branch_id` bigint(20) NOT NULL, `xid` varchar(100) CHARACTER SET utf8 COLLATE utf8_general_ci NOT NULL, `context` varchar(128) CHARACTER SET utf8 COLLATE utf8_general_ci NOT NULL, `rollback_info` longblob NOT NULL, `log_status` int(11) NOT NULL, `log_created` datetime(0) NOT NULL, `log_modified` datetime(0) NOT NULL, `ext` varchar(100) CHARACTER SET utf8 COLLATE utf8_general_ci NULL DEFAULT NULL, PRIMARY KEY (`id`) USING BTREE, UNIQUE INDEX `ux_undo_log`(`xid`, `branch_id`) USING BTREE ) ENGINE = InnoDB AUTO_INCREMENT = 3 CHARACTER SET = utf8 COLLATE = utf8_general_ci ROW_FORMAT = Dynamic;3、seata-order-servicepom<dependencies> <!-- API --> <dependency> <groupId>com.sw</groupId> <artifactId>cloud-api-commons</artifactId> <version>1.0-SNAPSHOT</version> </dependency> <!--nacos--> <dependency> <groupId>com.alibaba.cloud</groupId> <artifactId>spring-cloud-starter-alibaba-nacos-discovery</artifactId> </dependency> <!--seata--> <dependency> <groupId>com.alibaba.cloud</groupId> <artifactId>spring-cloud-starter-alibaba-seata</artifactId> <exclusions> <exclusion> <artifactId>seata-all</artifactId> <groupId>io.seata</groupId> </exclusion> </exclusions> </dependency> <dependency> <groupId>io.seata</groupId> <artifactId>seata-spring-boot-starter</artifactId> <version>1.4.0</version> </dependency> <!--feign--> <dependency> <groupId>org.springframework.cloud</groupId> <artifactId>spring-cloud-starter-openfeign</artifactId> </dependency> <!--web-actuator--> <dependency> <groupId>org.springframework.boot</groupId> <artifactId>spring-boot-starter-web</artifactId> </dependency> <dependency> <groupId>org.springframework.boot</groupId> <artifactId>spring-boot-starter-actuator</artifactId> </dependency> <!--mysql-druid--> <dependency> <groupId>mysql</groupId> <artifactId>mysql-connector-java</artifactId> </dependency> <dependency> <groupId>com.alibaba</groupId> <artifactId>druid-spring-boot-starter</artifactId> <version>1.1.16</version> </dependency> <dependency> <groupId>org.mybatis.spring.boot</groupId> <artifactId>mybatis-spring-boot-starter</artifactId> </dependency> <dependency> <groupId>org.springframework.boot</groupId> <artifactId>spring-boot-starter-test</artifactId> <scope>test</scope> </dependency> <dependency> <groupId>org.projectlombok</groupId> <artifactId>lombok</artifactId> <optional>true</optional> </dependency> </dependencies>ymlserver: port: 2001 spring: application: name: seata-order-service cloud: nacos: discovery: server-addr: localhost:8848 datasource: driver-class-name: com.mysql.jdbc.Driver url: jdbc:mysql://127.0.0.1:3306/seata_order?useSSL=true&serverTimezone=GMT%2B8&useUnicode=true&characterEncoding=utf-8 username: root password: 123456 seata: enabled: true application-id: ${spring.application.name} # 自定义事务组名称 tx-service-group: test_tx_group service: vgroup-mapping: test_tx_group: default config: nacos: namespace: server-addr: 127.0.0.1:8848 group: SEATA_GROUP userName: "nacos" password: "nacos" registry: type: nacos nacos: application: seata-server server-addr: 127.0.0.1:8848 namespace: userName: "nacos" password: "nacos" feign: hystrix: enabled: false logging: level: io: seata: info启动类@SpringBootApplication(exclude = DataSourceAutoConfiguration.class) //取消自动创建数据源 @EnableDiscoveryClient @EnableFeignClients @MapperScan("com.sw.mapper") public class SeataOrderMain2001 { public static void main(String[] args) { SpringApplication.run(SeataOrderMain2001.class, args); } }pojo@Data @NoArgsConstructor @AllArgsConstructor public class Order implements Serializable { private Long id; private Long userId; private Long productId; private Integer count; private BigDecimal money; private Integer status; //订单状态:0:创建中;1:已完结 }mapper@Repository public interface OrderMapper { /** * 新建订单 * @param order */ @Insert("insert into t_order(id,user_id,product_id,count,money,status) " + "values(null,#{userId},#{productId},#{count},#{money},0)") void create(Order order); /** * 更新订单 * @param userId * @param status */ @Update("update t_order set status = 1 " + "where user_id=#{userId} and status = #{status}") void update(@Param("userId")Long userId, @Param("status")Integer status); }serviceOrderServicepublic interface OrderService { void create(Order order); }StorageService@FeignClient("seata-storage-service") public interface StorageService { @PostMapping("/storage/decrease") CommonResult decrease(@RequestParam("productId")Long productId, @RequestParam("count")Integer count); }AccountService@FeignClient("seata-account-service") public interface AccountService { @PostMapping("/account/decrease") CommonResult decrease(@RequestParam("userId")Long userId, @RequestParam("money")BigDecimal money); }service实现@Service @Slf4j public class OrderServiceImpl implements OrderService { @Autowired private OrderMapper orderMapper; @Autowired private AccountService accountService; @Autowired private StorageService storageService; @Override public void create(Order order) { //1.新建订单 log.info("===开始新建订单==="); orderMapper.create(order); //2.扣减库存 log.info("===订单微服务调用库存==="); storageService.decrease(order.getProductId(), order.getCount()); log.info("===订单微服务调用库存,库存数量操作结束==="); //3.扣减账户 log.info("===订单微服务调用账户余额==="); accountService.decrease(order.getUserId(), order.getMoney()); log.info("===订单微服务调用账户余额,账户余额操作结束==="); //4.修改订单状态 log.info("===修改订单状态,开始==="); //从 0 到 1,1代表已经完成 orderMapper.update(order.getUserId(), 0); log.info("===修改订单状态,操作结束==="); log.info("订单操作完成(*^_^*)"); } }controller@RestController @RequestMapping("/order") public class OrderController { @Autowired private OrderService orderService; @GetMapping("/create") public CommonResult create(Order order){ orderService.create(order); return new CommonResult(200, "订单创建成功!"); } } config主启动类排除了数据源配置,此处需指定数据源代理@Configuration public class DataSourceProxyConfig { @Bean @ConfigurationProperties(prefix = "spring.datasource") public DataSource druidDataSource(){ return new DruidDataSource(); } @Primary @Bean("dataSource") public DataSourceProxy dataSourceProxy(DataSource dataSource){ return new DataSourceProxy(dataSource); } }4、seata-storage-serviceymlserver: port: 2002 spring: application: name: seata-storage-service cloud: nacos: discovery: server-addr: localhost:8848 datasource: driver-class-name: com.mysql.jdbc.Driver url: jdbc:mysql://127.0.0.1:3306/seata_storage?useSSL=true&serverTimezone=GMT%2B8&useUnicode=true&characterEncoding=utf-8 username: root password: 123456 seata: enabled: true application-id: ${spring.application.name} tx-service-group: test_tx_group service: vgroup-mapping: test_tx_group: default config: nacos: namespace: server-addr: 127.0.0.1:8848 group: SEATA_GROUP userName: "nacos" password: "nacos" registry: type: nacos nacos: application: seata-server server-addr: 127.0.0.1:8848 namespace: userName: "nacos" password: "nacos" feign: hystrix: enabled: false logging: level: io: seata: infomapper@Repository public interface StorageMapper { /** * 扣减库存信息 * @param productId * @param count */ @Update("update t_storage " + "set used = used + #{count}," + "residue = residue - #{count} "+ "where product_id = #{productId}" ) void decrease(@Param("productId")Long productId, @Param("count")Integer count); }servicepublic interface StorageService { void decrease(Long productId, Integer count); }service实现@Slf4j @Service public class StorageServiceImpl implements StorageService { @Autowired private StorageMapper storageMapper; @Override public void decrease(Long productId, Integer count) { log.info("===storage-service 开始扣减库存==="); storageMapper.decrease(productId, count); log.info("===storage-service 扣减库存操作结束==="); } }其他配置同理order微服务模块的5、seata-account-servicemapper@Repository public interface AccountMapper { /** * 扣减账户余额 * @param userId * @param money */ @Update("update t_account set "+ "used = used + #{money},"+ "residue = residue - #{money} "+ "where user_id = #{userId}" ) void decrease(@Param("userId")Long userId, @Param("money") BigDecimal money); }其他配置同理storage微服务模块的创建6、不添加全局事务管理测试seata-account-service模块1、手动模拟超时@Slf4j @Service public class AccountServiceImpl implements AccountService { @Autowired private AccountMapper accountMapper; @Override public void decrease(Long userId, BigDecimal money) { log.info("===account-service 开始扣减账户余额==="); //模拟超时异常 try { TimeUnit.SECONDS.sleep(20); } catch (InterruptedException e) { e.printStackTrace(); } accountMapper.decrease(userId, money); log.info("===account-service 扣减账户余额操作结束==="); } }浏览器输入http://localhost:2001/order/create?userId=1&productId=1&count=10&money=100报错Read TimeOut异常:此时数据库的状态:7、开启全局事务在order模块中添加全局事务注解@GlobalTransactional使用同样的方法测试,发生调用超时异常后,数据库中被修改的数据回滚到了操作之前的状态
-
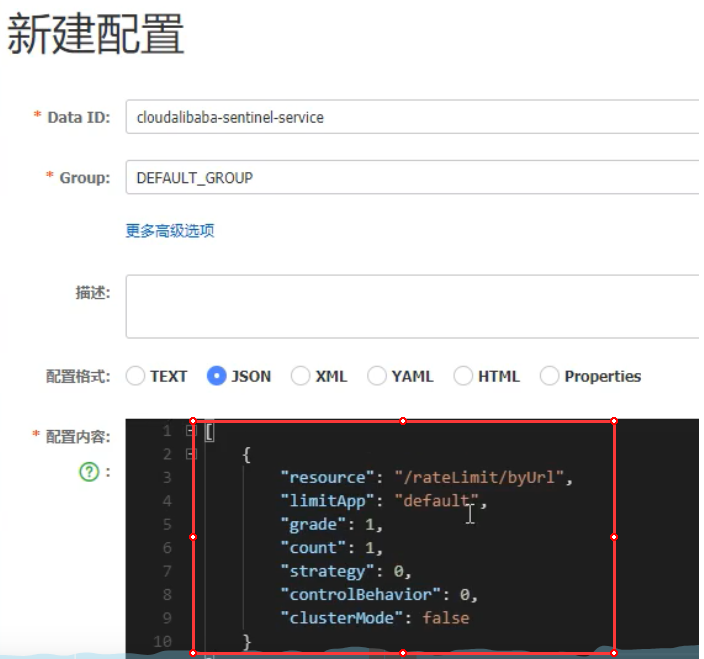
Sentinel规则持久化 默认规则是临时存储的,重启Sentinel服务之后消失1、环境搭建以8401模块为例添加pom依赖<!-- datasource-nacos --> <dependency> <groupId>com.alibaba.csp</groupId> <artifactId>sentinel-datasource-nacos</artifactId> </dependency>ymlserver: port: 8401 spring: application: name: cloud-alibaba-sentinel-service cloud: nacos: discovery: server-addr: localhost:8848 sentinel: transport: # sentinel dashboard地址 dashboard: localhost:8080 # 默认8719端口,如果8719被占用,默认递增 port: 8719 # 流控规则持久化 datasource: ds1: nacos: server-addr: localhost:8848 # namespace根据具体的情况指定 dataId: cloud-alibaba-sentinel-service groupId: DEFAULT_GROUP data-type: json rule-type: flow management: endpoints: web: exposure: include: '*'Nacos新建配置文件参数说明:resource:资源名称limitApp:应用来源grade:阈值类型,0:线程数,1:QPScount:单机阈值strategy:流控模式,0:直接,1:关联,2:链路controBehavier:流控效果,0:快速失败,1:Warm Up,2:排队等待clusterMode:是否集群2、测试1、启动8401,在Sentinel控制中心可以看到读取了Nacos那边配置的流控规则;2、关闭8401,Sentinel控制中心的规则消失;3、重启8401,重启之后如果出现了流控规则,则表明规则持久化配置成功。图片来源:尚硅谷 - 周阳 - Spring Cloud Alibaba
-
Sentinel整合Open Feign 1、环境搭建以8884模块为例pom文件添加依赖<!-- openfign --> <dependency> <groupId>org.springframework.cloud</groupId> <artifactId>spring-cloud-starter-openfeign</artifactId> </dependency>yml添加# 激活sentinel对feign的支持 feign: sentinel: enabled: true启动类@SpringBootApplication @EnableDiscoveryClient @EnableFeignClients public class OrderMain84 { public static void main(String[] args) { SpringApplication.run(OrderMain84.class, args); } }创建远程调用接口@FeignClient(value = "nacos-payment-provider") public interface PaymentService { @GetMapping("/payment/{id}") public CommonResult<Payment> payment(@PathVariable("id")Long id); }实现类(用于服务降级)@Component public class PaymentFallbackService implements PaymentService { @Override public CommonResult<Payment> payment(Long id) { return new CommonResult<Payment>(444, "服务降级返回--PaymentService", new Payment(id, "errorSerial")); } }接口指定降级的类@FeignClient(value = "nacos-payment-provider", fallback = PaymentFallbackService.class) public interface PaymentService { @GetMapping("/payment/{id}") public CommonResult<Payment> payment(@PathVariable("id")Long id); }controller@Resource private PaymentService service; @GetMapping("/payment/{id}") public CommonResult<Payment> payment(@PathVariable("id")Long id){ return service.payment(id); }2、测试启动9003、8884,如果中途9003出现问题关闭,8884服务降级成功3、熔断框架比较 SentinelHystrixresilience4j隔离策略信号量隔离线程池/信号量隔离信号量隔离熔断降级策略基于响应时间、异常比例、异常数异常比例异常比例、响应时间实时统计滑动窗口(LeapArray)滑动窗口(Rxjava)Ring Bit Buffer动态规则支持多种数据源支持多种数据源有限的支持扩展性多个扩展点插件接口基于注解的支持支持支持支持限流QPS、调用关系有限的支持Rate Limiter图片来源:尚硅谷 - 周阳 - Spring Cloud Alibaba
-
服务熔断 1、环境搭建1、启动Nacos、Sentinel2、新建9003、9004两个模块pom<!-- API --> <dependency> <groupId>com.sw</groupId> <artifactId>cloud-api-commons</artifactId> <version>1.0-SNAPSHOT</version> </dependency> <!-- Nacos --> <dependency> <groupId>com.alibaba.cloud</groupId> <artifactId>spring-cloud-starter-alibaba-nacos-discovery</artifactId> </dependency> <dependency> <groupId>org.springframework.boot</groupId> <artifactId>spring-boot-starter-web</artifactId> </dependency> <dependency> <groupId>org.springframework.boot</groupId> <artifactId>spring-boot-starter-actuator</artifactId> </dependency> <dependency> <groupId>org.springframework.boot</groupId> <artifactId>spring-boot-starter-test</artifactId> <scope>test</scope> </dependency> <dependency> <groupId>org.springframework.boot</groupId> <artifactId>spring-boot-devtools</artifactId> <scope>runtime</scope> <optional>true</optional> </dependency>ymlserver: port: 9003 spring: application: name: nacos-payment-provider cloud: nacos: discovery: server-addr: localhost:8848 management: endpoints: web: exposure: include: '*'启动类@SpringBootApplication @EnableDiscoveryClient public class PaymentMain9003 { public static void main(String[] args) { SpringApplication.run(PaymentMain9003.class, args); } }controller(此处的虚拟数据库是为了方便演示)@RestController @RequestMapping("/payment") public class PaymentController { @Value("${server.port}") private String serverPort; public static Map<Long, Payment> map = new HashMap<>(); static { map.put(1L, new Payment(1L, "螺蛳粉01")); map.put(2L, new Payment(2L, "螺蛳粉02")); map.put(3L, new Payment(3L, "螺蛳粉03")); } @GetMapping("/{id}") public CommonResult<Payment> payment(@PathVariable("id")Long id){ Payment payment = map.get(id); CommonResult<Payment> result = new CommonResult<>(200, "serverPort: " + serverPort, payment); return result; } }注:9004构建步骤与9003一致2、新建8884模块pom同理9004、9004模块ymlserver: port: 8884 spring: application: name: nacos-order-consumer cloud: nacos: discovery: server-addr: localhost:8848 sentinel: transport: # sentinel dashboard地址 dashboard: localhost:8080 # 默认8719端口,如果8719被占用,默认递增 port: 8719 service-url: nacos-user-service: http://nacos-payment-provider management: endpoints: web: exposure: include: '*'启动类@SpringBootApplication @EnableDiscoveryClient public class OrderMain84 { public static void main(String[] args) { SpringApplication.run(OrderMain84.class, args); } }config配置类@Configuration public class ApplicationContextConfig { @Bean @LoadBalanced public RestTemplate getRestTemplate(){ return new RestTemplate(); } }controller@RestController @RequestMapping("/consumer") public class CircleBreakerController { public static final String SERVICE_URL = "http://nacos-payment-provider"; @Autowired private RestTemplate restTemplate; @GetMapping(value = "fallback/{id}", produces = {"application/json;charset=UTF-8"}) @SentinelResource("fallback") public CommonResult<Payment> fallback(@PathVariable("id")Long id){ CommonResult<Payment> result = restTemplate.getForObject(SERVICE_URL + "/payment/" + id, CommonResult.class, id); if (id ==4){ throw new IllegalArgumentException("参数异常!"); }else if (result.getData() == null){ throw new NullPointerException("没有找到对应id的记录!"); } return result; } }指定降级方法@RestController @RequestMapping("/consumer") public class CircleBreakerController { public static final String SERVICE_URL = "http://nacos-payment-provider"; @Autowired private RestTemplate restTemplate; @GetMapping(value = "fallback/{id}", produces = {"application/json;charset=UTF-8"}) //@SentinelResource("fallback") @SentinelResource(value = "fallback", fallback = "handlerFallback") //fallback只负责业务异常 public CommonResult<Payment> fallback(@PathVariable("id")Long id){ CommonResult<Payment> result = restTemplate.getForObject(SERVICE_URL + "/payment/" + id, CommonResult.class, id); if (id ==4){ throw new IllegalArgumentException("参数异常!"); }else if (result.getData() == null){ throw new NullPointerException("没有找到对应id的记录!"); } return result; } public CommonResult handlerFallback(@PathVariable("id")Long id, Throwable e){ Payment payment = new Payment(id, "null"); return new CommonResult(444,"handlerFallback,异常内容:" + e.getMessage(), payment); } }2、测试启动测试:注:此处没有使用Sentinel来配置降级规则,但却降级成功,是因为fallback用于管理异常,当业务发生异常时,可以降级到指定的方法为业务添加blockhandler@RestController @RequestMapping("/consumer") public class CircleBreakerController { public static final String SERVICE_URL = "http://nacos-payment-provider"; @Autowired private RestTemplate restTemplate; @GetMapping(value = "fallback/{id}", produces = {"application/json;charset=UTF-8"}) //@SentinelResource("fallback") //@SentinelResource(value = "fallback", fallback = "handlerFallback") //fallback只负责业务异常 @SentinelResource(value = "fallback", blockHandler = "blockHandler") //blockHandler只负责sentinel控制台的配置 public CommonResult<Payment> fallback(@PathVariable("id")Long id){ CommonResult<Payment> result = restTemplate.getForObject(SERVICE_URL + "/payment/" + id, CommonResult.class, id); if (id ==4){ throw new IllegalArgumentException("参数异常!"); }else if (result.getData() == null){ throw new NullPointerException("没有找到对应id的记录!"); } return result; } // public CommonResult handlerFallback(@PathVariable("id")Long id, Throwable e){ // Payment payment = new Payment(id, "null"); // return new CommonResult(444,"handlerFallback,异常内容:" + e.getMessage(), payment); // } public CommonResult blockHandler(@PathVariable("id")Long id, BlockException exception){ Payment payment = new Payment(id, "null"); return new CommonResult(444,"blockHandler,异常内容:" + exception.getMessage(), payment); } }测试结果:注:可以看到返回结果直接报错,并没有降级,所以说blockHandler只适用于Sentinel配置的规则同时配置fallback和blockHandler@RestController @RequestMapping("/consumer") public class CircleBreakerController { public static final String SERVICE_URL = "http://nacos-payment-provider"; @Autowired private RestTemplate restTemplate; @GetMapping(value = "fallback/{id}", produces = {"application/json;charset=UTF-8"}) //@SentinelResource("fallback") //@SentinelResource(value = "fallback", fallback = "handlerFallback") //fallback只负责业务异常 //@SentinelResource(value = "fallback", blockHandler = "blockHandler") //blockHandler只负责sentinel控制台的配置 @SentinelResource(value = "fallback", fallback = "handlerFallback", blockHandler = "blockHandler") public CommonResult<Payment> fallback(@PathVariable("id")Long id){ CommonResult<Payment> result = restTemplate.getForObject(SERVICE_URL + "/payment/" + id, CommonResult.class, id); if (id ==4){ throw new IllegalArgumentException("参数异常!"); }else if (result.getData() == null){ throw new NullPointerException("没有找到对应id的记录!"); } return result; } public CommonResult handlerFallback(@PathVariable("id")Long id, Throwable e){ Payment payment = new Payment(id, "null"); return new CommonResult(444,"handlerFallback,异常内容:" + e.getMessage(), payment); } public CommonResult blockHandler(@PathVariable("id")Long id, BlockException exception){ Payment payment = new Payment(id, "null"); return new CommonResult(444,"blockHandler,异常内容:" + exception.getMessage(), payment); } } 配置Sentinel规则:结果:可以看到,同时配置fallback和blockHandler,blockHandler的优先级更高exceptionsToIgnore属性@RestController @RequestMapping("/consumer") public class CircleBreakerController { public static final String SERVICE_URL = "http://nacos-payment-provider"; @Autowired private RestTemplate restTemplate; @GetMapping(value = "fallback/{id}", produces = {"application/json;charset=UTF-8"}) //@SentinelResource("fallback") //@SentinelResource(value = "fallback", fallback = "handlerFallback") //fallback只负责业务异常 //@SentinelResource(value = "fallback", blockHandler = "blockHandler") //blockHandler只负责sentinel控制台的配置 @SentinelResource(value = "fallback", fallback = "handlerFallback", blockHandler = "blockHandler", exceptionsToIgnore = {IllegalArgumentException.class}) public CommonResult<Payment> fallback(@PathVariable("id")Long id){ CommonResult<Payment> result = restTemplate.getForObject(SERVICE_URL + "/payment/" + id, CommonResult.class, id); if (id ==4){ throw new IllegalArgumentException("参数异常!"); }else if (result.getData() == null){ throw new NullPointerException("没有找到对应id的记录!"); } return result; } public CommonResult handlerFallback(@PathVariable("id")Long id, Throwable e){ Payment payment = new Payment(id, "null"); return new CommonResult(444,"handlerFallback,异常内容:" + e.getMessage(), payment); } public CommonResult blockHandler(@PathVariable("id")Long id, BlockException exception){ Payment payment = new Payment(id, "null"); return new CommonResult(444,"blockHandler,异常内容:" + exception.getMessage(), payment); } }测试结果:注:使用exceptionsToIgnore指定异常类,表示当前方法如果抛出了指定的异常,不进行降级处理,直接返回抛出的异常结果图片来源:尚硅谷 - 周阳 - Spring Cloud Alibaba
-
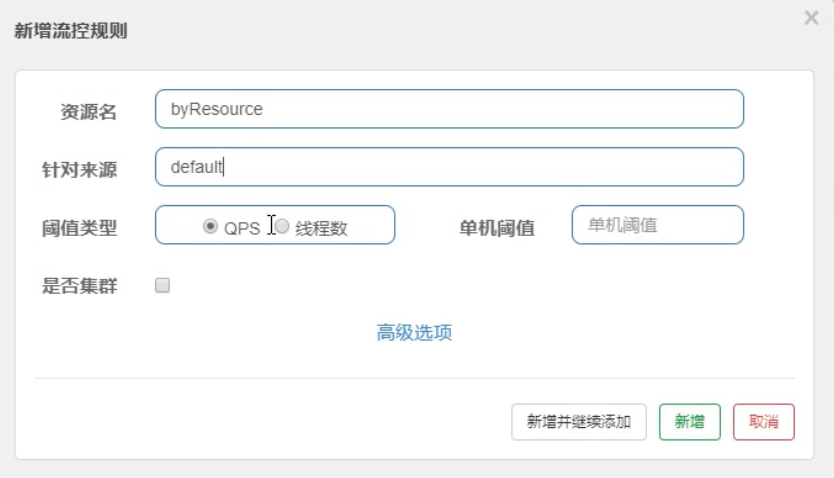
@SentinelResource注解 1、环境搭建(8401模块)8401模块的pom增加以下依赖<!--通用Commons--> <dependency> <groupId>com.sw</groupId> <artifactId>cloud-api-commons</artifactId> <version>1.0-SNAPSHOT</version> </dependency>controller@RestController public class RateLimitController { @GetMapping(value = "/byResource", produces = {"application/json;charset=UTF-8"}) @SentinelResource(value = "byResource", blockHandler = "handlerException") public CommonResult<JSONObject> byResource(){ return new CommonResult(200, "按资源名称测试限流",new Payment(100L, "干脆面")); } public CommonResult<JSONObject> handlerException(BlockException exception){ return new CommonResult(444, exception.getClass().getCanonicalName() + "\t 服务不可用!"); } }限流规则注:配置了@SentinelResource注解后,资源名填byResource或者/byResource都可以测试2、自定义限流规则单独创建一个handler类,用于处理限流public class CustomerBlockHandler { public static CommonResult handlerException1(BlockException exception){ return new CommonResult(444, "global handlerException01"); } public static CommonResult handlerException2(BlockException exception){ return new CommonResult(444, "global handlerException02"); } }controller指定自定义的降级方法@GetMapping(value = "/customerBlockHandler", produces = {"application/json;charset=UTF-8"}) @SentinelResource(value = "customerBlockHandler", blockHandlerClass = CustomerBlockHandler.class, blockHandler = "handlerException2" ) public CommonResult<JSONObject> customerBlockHandler(){ return new CommonResult(200, "按客户自定义测试限流",new Payment(100L, "干脆面")); }Sentinel自定义限流规则测试补充3、其他属性@SentinelResource不适用于private方法value:资源名称,必需项(不能为空);entryType:entry类型,可选项(默认为 EntryType.OUT);fallback:fallback函数名称,可选项,用于在抛出异常的时候提供 fallback处理逻辑;fallback函数可以针对所有类型的异常(除了exceptionsToIgnore里面排除掉的异常类型)进行处理。fallback函数签名和位置要求: 返回值类型必须与原函数返回值类型一致;方法参数列表需要和原函数一致,或者可以额外多一个 Throwable类型的参数用于接收对应的异常;fallback函数默认需要和原方法在同一个类中。若希望使用其他类的函数,则可以指定 fallbackClass为对应的类的 Class 对象,注意对应的函数必需为 static函数,否则无法解析。 defaultFallback(since 1.6.0):默认的 fallback函数名称,可选项,通常用于通用的 fallback逻辑(即可以用于很多服务或方法)。默认 fallback函数可以针对所有类型的异常(除了exceptionsToIgnore里面排除掉的异常类型)进行处理。若同时配置了 fallback和 defaultFallback,则只有 fallback会生效。defaultFallback函数签名要求:返回值类型必须与原函数返回值类型一致;方法参数列表需要为空,或者可以额外多一个 Throwable 类型的参数用于接收对应的异常;defaultFallback函数默认需要和原方法在同一个类中。若希望使用其他类的函数,则可以指定 fallbackClass为对应的类的 Class 对象,注意对应的函数必需为 static 函数,否则无法解析;exceptionsToIgnore(since 1.6.0):用于指定哪些异常被排除掉,不会计入异常统计中,也不会进入 fallback 逻辑中,而是会原样抛出。图片来源:尚硅谷 - 周阳 - Spring Cloud Alibaba
-
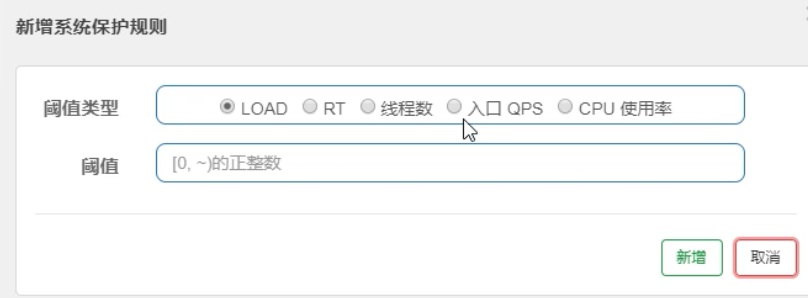
系统保护规则 参数说明:LOAD自适应:(仅对Linux/Unix生效)系统的1oad1作为启发指标,进行自适应系统保护。当系统load1超过设定的启发值,且系统当前的并发线程数超过估算的系统容量时才会触发系统保护(BBR阶段),系统容量由maxQps * minRt估算得出,设定的参考值一般为:CPU cores * 2.5RT:单台机器上所有入口流量的平均RT达到阈值,触发系统保护,单位:ms线程数:单台机器上所有入口流量的并发线程数达到阈值,触发系统保护入口QPS:单台机器上所有入口流量的QPS达到阈值,触发系统保护CPU使用率:当系统CPU使用率超过阈值,触发系统保护测试(以入口QPS为例):图片来源:尚硅谷 - 周阳 - Spring Cloud Alibaba