
搜索到
463
篇与
的结果
-
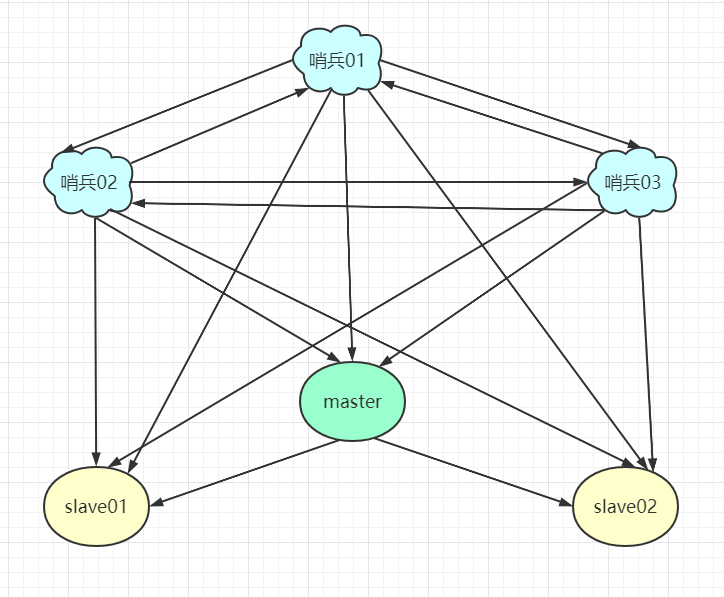
 Redis哨兵模式 哨兵模式Redis 2.8引入,Rentinel哨兵模式哨兵模式是一种特殊的模式,它是一个独立的进程,其原理是:哨兵通过发送命令,等待redis服务器响应,从而监控运行的多个redis实例。哨兵模式的作用:通过发送命令,让redis服务器返回监控的运行状态(包括主从所有节点)当哨兵检测到master宕机,会在自动将slave切换为master,然后通过发布订阅模式通知其他的从服务器,修改配置文件,让他们切换主服务器节点一般情况下使用多个哨兵进行监控,且哨兵之间互相监督:当master节点出现问题时,哨兵01先检测到问题,系统并不会马上进行failover,仅仅是哨兵01主观的认为主节点不可用,这个过程称为主观下线。当其他哨兵也检测到主节点服务不可用时,并且数量达到了一定的值,那么哨兵之间就会进行一次投票,投票的结果由一个哨兵发起,进行failover(故障转移)操作。当切换完成之后,就会通过发布订阅模式让各个哨兵把自己监控的节点进行master主节点切换(从故障节点切换为投票后票数最高的节点),这个过程称为客观下线。测试1、redis配置文件目录下新建sentinel.conf#sentinel monitor 被监控名 主机地址 端口 1 sentinel monitor myredis 127.0.0.1 6380 1 #master节点密码(必须配置) sentinel auth-pass myredis 123456 后面的数字1,代表当主机出现问题时,slave进行投票决定让谁成为主机,票数最多的成为主节点2、启动哨兵模式[root@suaxi bin]# redis-sentinel sconf/sentinel.conf 19524:X 03 Jan 2021 21:33:38.148 # oO0OoO0OoO0Oo Redis is starting oO0OoO0OoO0Oo 19524:X 03 Jan 2021 21:33:38.148 # Redis version=6.0.9, bits=64, commit=00000000, modified=0, pid=1 started 19524:X 03 Jan 2021 21:33:38.148 # Configuration loaded _._ _.-``__ ''-._ _.-`` `. `_. ''-._ Redis 6.0.9 (00000000/0) 64 bit .-`` .-```. ```\/ _.,_ ''-._ ( ' , .-` | `, ) Running in sentinel mode |`-._`-...-` __...-.``-._|'` _.-'| Port: 26379 | `-._ `._ / _.-' | PID: 19524 `-._ `-._ `-./ _.-' _.-' |`-._`-._ `-.__.-' _.-'_.-'| | `-._`-._ _.-'_.-' | http://redis.io `-._ `-._`-.__.-'_.-' _.-' |`-._`-._ `-.__.-' _.-'_.-'| | `-._`-._ _.-'_.-' | `-._ `-._`-.__.-'_.-' _.-' `-._ `-.__.-' _.-' `-._ _.-' `-.__.-' 19524:X 03 Jan 2021 21:33:38.149 # Sentinel ID is dce67565b60ad27529a7bbcfe2457faa3a306c4e 19524:X 03 Jan 2021 21:33:38.149 # +monitor master myredis 127.0.0.1 6379 quorum 1 19524:X 03 Jan 2021 21:33:38.151 * +slave slave 127.0.0.1:6380 127.0.0.1 6380 @ myredis 127.0.0.1 6 19524:X 03 Jan 2021 21:33:38.155 * +slave slave 127.0.0.1:6381 127.0.0.1 6381 @ myredis 127.0.0.1 6 19524:X 03 Jan 2021 21:34:20.556 # +sdown master myredis 127.0.0.1 6379 19524:X 03 Jan 2021 21:34:20.556 # +odown master myredis 127.0.0.1 6379 #quorum 1/1 19524:X 03 Jan 2021 21:34:20.556 # +new-epoch 3 19524:X 03 Jan 2021 21:34:20.556 # +try-failover master myredis 127.0.0.1 6379 19524:X 03 Jan 2021 21:34:20.560 # +vote-for-leader dce67565b60ad27529a7bbcfe2457faa3a306c4e 3 19524:X 03 Jan 2021 21:34:20.560 # +elected-leader master myredis 127.0.0.1 6379 19524:X 03 Jan 2021 21:34:20.560 # +failover-state-select-slave master myredis 127.0.0.1 6379 19524:X 03 Jan 2021 21:34:20.622 # +selected-slave slave 127.0.0.1:6380 127.0.0.1 6380 @ myredis 1279 19524:X 03 Jan 2021 21:34:20.622 * +failover-state-send-slaveof-noone slave 127.0.0.1:6380 127.0.0.yredis 127.0.0.1 6379 19524:X 03 Jan 2021 21:34:20.674 * +failover-state-wait-promotion slave 127.0.0.1:6380 127.0.0.1 63is 127.0.0.1 6379 19524:X 03 Jan 2021 21:34:21.037 # +promoted-slave slave 127.0.0.1:6380 127.0.0.1 6380 @ myredis 1279 19524:X 03 Jan 2021 21:34:21.037 # +failover-state-reconf-slaves master myredis 127.0.0.1 6379 19524:X 03 Jan 2021 21:34:21.104 * +slave-reconf-sent slave 127.0.0.1:6381 127.0.0.1 6381 @ myredis 6379 19524:X 03 Jan 2021 21:34:22.060 * +slave-reconf-inprog slave 127.0.0.1:6381 127.0.0.1 6381 @ myred.1 6379 如果之前端口为6379的主节点重新恢复后,不能再成为主节点,哨兵模式会将其分配为slave从节点优缺点优点:1、哨兵模式集群基于主从复制模式2、主从切换,系统可用性更好缺点:1、哨兵集群容量很大,在线扩容不方便2、哨兵模式配置繁杂sentinel.conf详细配置# Example sentinel.conf # 运行端口默认26379 port 26379 # 工作目录 dir /tmp # 监控的redis主节点 # master-name 可自定义命名的主节点名字,只能由字母A-Z、数字0-9、.-_等字符组成 # quorum 配置多少个哨兵节点同意认为master节点失联,这时客观认为主节点已失联(客观下线) # sentinel monitor <master-name> <ip> <redis-port> <quorum> sentinel monitor myredis 127.0.0.1 6379 1 # 设置哨兵连接主节点的密码 # sentinel auth-pass <master-name> <password> sentinel auth-pass myredis 123456 # 指定多少毫秒后,主节点没有应答哨兵监控,哨兵主观上认为主节点出现问题,默认为30秒 # sentinel down-after-milliseconds <master-name> <milliseconds> sentinel down-after-milliseconds myredis 30000 # 指定在发生failover[故障转移]主备切换时,有多少个slave节点同时对新的master节点进行同步 # 数字越小,完成failover的时间越长,数字越大,越多的slave节点会因replication而不可用 # 可将这个值设为1,来保证每次只有一个slave节点处于不能处理命令请求的状态 # sentinel parallel-syncs <master-name> <numslaves> sentinel parallel-syncs myredis 1 # 故障转移超时时间 failover-timeout,可用于以下几个方面 # 1.同一个sentinel对同一个master两次failover之间的时间间隔 # 2.当一个slave从一个出现问题的master那里同步数据开始计算时间,直到slave被纠正为向正确的master同步数据时 # 3.当想要取消一个正在进行failover所需要的时间 # 4.当进行failover时,配置所有slave指向新的master所需的最大时间(即使过了这个时间,slave依然会被配置到正确的master,此时不遵循parallel-syncs规则) # 默认为三分钟,单位毫秒 # sentinel failover-timeout <master-name> <milliseconds> sentinel failover-timeout myredis 180000 # SCRIPTS EXECUTION # 配置当某一事件发生时所需要执行的脚本,以此来通知管理员 # 1.若脚本执行后返回1,那么该脚本稍后会被再次执行,默认次数为10 # 2.若脚本执行后返回2,或者比2更高的一个返回值,脚本将不会被重复执行 # 3.如果脚本在执行过程中收到系统中断信号而被终止,则与返回值为1时的操作一致 # 一个脚本的最大执行时间为60s,将会被SIGKILL信号终止,之后重新执行 # 通知型脚本:当sentinel有任何警告级别的事件发生时(比如说redis实例的主观失效和客观失效等等),将会去调用这个脚本,这时这个脚本应该通过邮件,SMS等方式去通知系统管理员关于系统不正常运行的信息。调用该脚本时,将传给脚本两个参数,一个是事件的类型,一个是事件的描述。如果sentinel.conf配置文件中配置了这个脚本路径,那么必须保证这个脚本存在于这个路径,并且是可执行的,否则sentinel无法正常启动成功。 # sentinel notification-script <master-name> <script-path> sentinel notification-script myredis /var/redis/notify.sh # 客户端重新配置主节点参数脚本 # 当一个master由于failover而发生改变时,这个脚本将会被调用,通知相关的客户端关于master地址已经发生改变的信息。 # 以下参数将会在调用脚本时传给脚本: # <master-name> <role> <state> <from-ip> <from-port> <to-ip> <to-port> # 目前<state>总是“failover”, # <role>是“leader”或者“observer”中的一个。 # 参数 from-ip, from-port, to-ip, to-port是用来和旧的master和新的master(即旧的slave)通信的 # 这个脚本应该是通用的,能被多次调用,不是针对性的。 # sentinel client-reconfig-script <master-name> <script-path> sentinel client-reconfig-script myredis /var/redis/reconfig.sh
 -
Redis主从复制 Redis主从复制默认情况下,每台redis服务器都是master主节点1、概念将一台redis服务器的数据,复制到其他redis服务器上,前者称为主节点(master/leader),后者称为从节点(slave/follower),数据的复制是单向的,只能由主节点到从节点,Master以写为主,Slave以读为主。一般来说,一个主节点可以有多个从节点,但一个从节点,只能有一个主节点。2、作用数据冗余:实现了数据的热备份,是持久化之外的另一种数据冗余方式故障恢复:当主节点出现问题时,可以由从节点提供服务,实现快速的故障恢复(服务冗余)负载均衡:在主从复制的基础上,配合读写分离,在redis写数据时应用连接主节点,读数据时应用连接从节点,以此分担服务器负载(读多写少)高可用(集群)基石:主从复制是哨兵模式和集群的基础3、一主二从配置:此处以单机多集群为例:1、修改端口,2、修改日志文件名6380.log (为避免单机多集群情况下文件名重复,以下同理),3、修改pid文件名redis_6380.pid,4、修改dump文件名dump6380.rdb,5、配置主节点地址replicaof 127.0.0.1 63796、配置主节点密码masterauth 1234566380、6381从节点以此类推需特别注意密码配置的方式:主节点redis.conf配置密码的方式为:requirepass 123456从机redis.conf配置密码的方式为:masterauth 123456如果主节点配置了密码,从机一定要配置,不然连不上主节点补充:也可以通过命令行配置(重启redis服务之后配置失效)127.0.0.1:6380> SLAVEOF 127.0.0.1 6379 #SLAVEOF host port OK 127.0.0.1:6380> info replication #查看节点信息 # Replication role:slave master_host:127.0.0.1 master_port:6379 #主节点 master_link_status:up master_last_io_seconds_ago:5 master_sync_in_progress:0 slave_repl_offset:0 slave_priority:100 slave_read_only:1 connected_slaves:0 master_replid:ed6d6cc071c41636468cecadd52b61d6c9b130af master_replid2:0000000000000000000000000000000000000000 master_repl_offset:0 second_repl_offset:-1 repl_backlog_active:1 repl_backlog_size:1048576 repl_backlog_first_byte_offset:1 repl_backlog_histlen:0 127.0.0.1:6380> 查看主节点信息:127.0.0.1:6379> info replication # Replication role:master #角色 connected_slaves:2 slave0:ip=127.0.0.1,port=6380,state=online,offset=42,lag=0 #从机信息1 slave1:ip=127.0.0.1,port=6381,state=online,offset=42,lag=1 #从机信息2 master_replid:ed6d6cc071c41636468cecadd52b61d6c9b130af master_replid2:0000000000000000000000000000000000000000 master_repl_offset:42 second_repl_offset:-1 repl_backlog_active:1 repl_backlog_size:1048576 repl_backlog_first_byte_offset:1 repl_backlog_histlen:42 127.0.0.1:6379> 4、复制原理1、Slave启动连接到Master后会发送一个sync同步命令2、Master接到命令,启动后台的存盘进程,同时收集所有接收到的修改数据集的命令,在后台进程执行完毕之后,master传送整个数据文件到slave,同时完成一次完全同步全量复制:slave接收到数据文件之后,将其存盘并加载到内存中增量复制:Master继续将收集到的新的修改命令依次传给Slave,完成同步5、层层节点
-
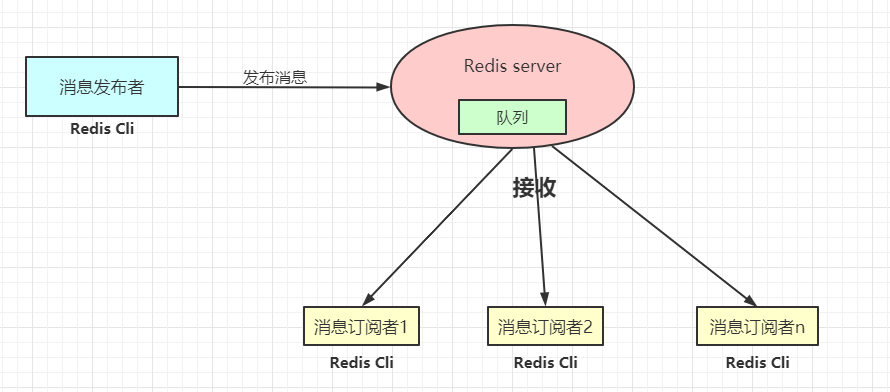
Redis发布订阅 Redis发布订阅发布订阅(pub/sub)是一种消息通信模式:发送者(pub)发送消息,订阅者(sub)接收消息命令命令及描述PSUBSCRIBE pattern [pattern...]订阅一个或多个符合给定模式的频道PUBSUB subcommand [argument [argument...]]查看订阅与发布系统状态PUBLISH channel message将信息发送到指定的频道PUNSUBSCRIBE [pattern [pattern...]]退订所有给定模式的频道SUBSCRIBE channel [channel...]订阅给定的一个或多个的频道信息UNSUBSCRIBE [channel[channel...]]退订指定的频道测试订阅者:127.0.0.1:6379> SUBSCRIBE test #订阅名为test的频道 Reading messages... (press Ctrl-C to quit) #订阅之后自动监听 1) "subscribe" 2) "test" 3) (integer) 1 # 监听消息,等待推送读取 1) "message" #消息 2) "test" #来自哪个频道 3) "nihao" #消息内容 1) "message" 2) "test" 3) "xiexie" 发布者:127.0.0.1:6379> PUBLISH test nihao #发布者发布消息到test频道 (integer) 1 127.0.0.1:6379> PUBLISH test xiexie (integer) 1 127.0.0.1:6379> 原理常用于微信公众号、微博、实时聊天等通过SUBSCRIBE命令订阅某频道后,redis-server里维护了一个字典,字典的键可以看作是一个个的频道,而字典的值则是一个链表,链表中保存了所有订阅这个频道(channel)的客户端。换句话说,就是将客户端添加到指定频道(channel)的订阅链表中。通过PUBLISH命令向订阅者发送消息,redis-server会使用给定的频道作为键,在它所维护的频道(channel)字典中查找订阅了这个频道的所有客户端的链表,遍历这个链表,将消息发布给所有订阅者。
-
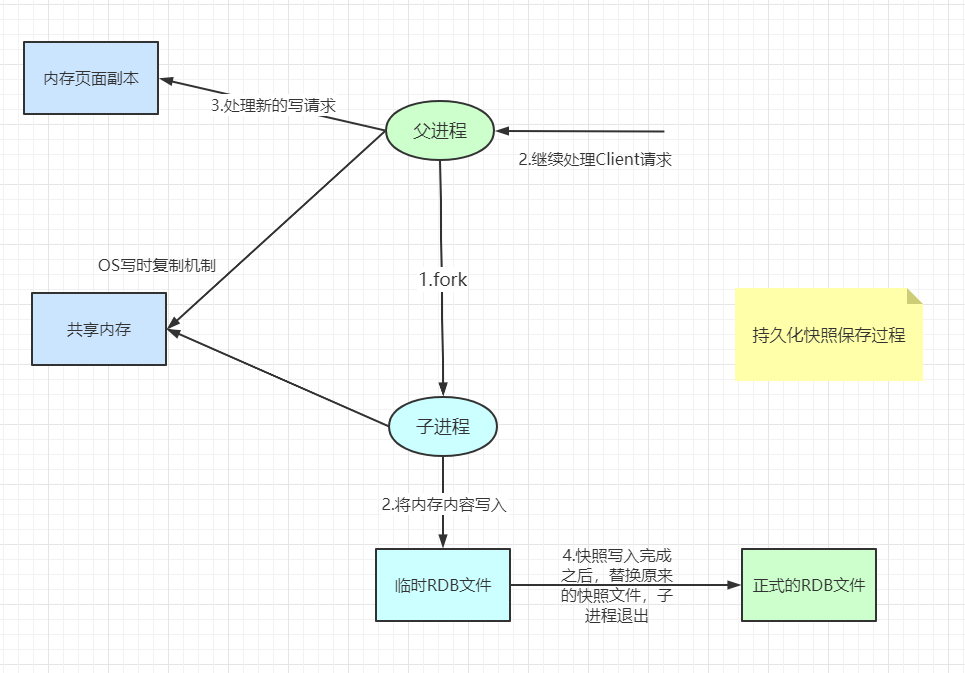
Redis持久化 Redis持久化RDB(Redis DataBase)在指定的时间间隔内将内存中的数据集体写入磁盘(Sanpshot快照),恢复时将快照文件直接读取到内存中触发机制1、满足save规则的情况时2、执行flushall3、退出redis时,也会产生rdb文件如何恢复rdb文件将rdp文件放在redis的启动目录即可,redis启动时会自动检查dump.rdb文件,恢复其中的数据# 查看目录 127.0.0.1:6379> config get dir 1) "dir" 2) "/usr/local/bin" 127.0.0.1:6379> 优点:适合大规模的数据恢复对数据的完整性不敏感的业务缺点:操作需要一定的时间间隔,特殊情况下,最后一次的修改数据可能会丢失(宕机)fork进程时,会占用一定的空间AOF(Append Only File)以日志的形式记录每个写的操作,将Redis执行过程的所有指令记录下来(不记录读操作),只追加文件不允许改写文件,redis启动时会读取该文件重新构建数据,即:启动时根据日志文件的内容,将写操作从头到尾执行一次已完成数据恢复。redis.conf配置配置文件默认不开启aof,需手动设置为yes,重启redis即可生效重写规则当文件大小超过64mb时,会fork一个新的进程来重写文件(文件占用的内存空间会越来越大)redis-check-aofaof文件有误,redis启动失败如果aof文件中存在错误,可用redis-check-aof --fix命令修复这个文件修复完成之后重新启动redis即可优点:没修改一次,都会进行同步,数据的完整性更好效率更高缺点:每秒同步一次,极端情况下可能会丢失最后一秒的数据aof文件远大于rdb文件,修复速度也比rdb慢整体运行效率比rdb慢RDB与AOF对比:图片来源:狂神说Java
-
redis.conf配置文件笔记 单位# 不区分大小写 # 1k => 1000 bytes # 1kb => 1024 bytes # 1m => 1000000 bytes # 1mb => 1024*1024 bytes # 1g => 1000000000 bytes # 1gb => 1024*1024*1024 bytesinclude# 包含,类似于Spring的import,include include /path/to/local.conf include /path/to/other.conf网络bind 127.0.0.1 #绑定的IP,*代表允许全部访问 protected-mode yes #保护模式 port 6379 #端口通用配置 GENERALdaemonize yes #以进程守护的方式运行,默认值为no,需手动设置 pidfile /var/run/redis_6379.pid #如果以后台方式运行,需要指定一个pid文件 # 日志 # Specify the server verbosity level. # This can be one of: # debug (a lot of information, useful for development/testing) 开发/测试环境 # verbose (many rarely useful info, but not a mess like the debug level) # notice (moderately verbose, what you want in production probably) 生产环境 # warning (only very important / critical messages are logged) loglevel notice logfile "" #日志的文件位置/名字 databases 16 #数据库的数量,默认为16个 always-show-logo yes #是否总是显示Redis的logo快照 SNAPSHOTTING持久化,在规定的时间内,执行了多少次操作,则会持久化到文件 .aof .rdb#在900秒内,如果至少有 1 key进行了修改,就进行持久化操作 save 900 1 #在300秒内,如果至少有 10 key进行了修改,就进行持久化操作 save 300 10 #在60秒内,如果至少有 10000 key进行了修改,就进行持久化操作 save 60 10000 stop-writes-on-bgsave-error yes #持久化操作出错时是否继续进行,默认为yes rdbcompression yes #是否压缩rdb文件,默认为yes rdbchecksum yes #保存rdb文件时,是否进行错误校验,默认为yes dir ./ #rdb文件保存的目录主从复制 REPLICATION安全 SECURITYconfig get requirepass #获取redis密码 config set requirepass "123" #设置redis密码限制 CLIENTSmaxclients 10000 #客户端最大默认连接数量 maxmemory <bytes> #配置redis最大内存,默认单位为字节 maxmemory-policy noeviction #内存达到上限之后的处理策略 volatile-lru:只对设置了过期时间的key进行LRU(默认值) allkeys-lru : 删除lru算法的key volatile-random:随机删除即将过期key allkeys-random:随机删除 volatile-ttl : 删除即将过期的 noeviction : 永不过期,返回错误APPEND ONLY MODE aof配置appendonly no #默认不开启(redis默认使用的是rdb持久化方式,通常情况下,rdb完全够用了) appendfilename "appendonly.aof" #持久化文件的名字 # appendfsync always #每次修改都会 sync,消耗性能 appendfsync everysec #每秒执行一次 sync,特殊情况下可能会丢失这一秒的数据(宕机) # appendfsync no #不执行 sync,由操作系统自己同步数据
-
SpringBoot整合Redis jedis:采用直连,多个线程操作是不安全的,为了安全起见可以使用jedis pool,更像BIO模式lettuce:采用netty,实例可以在多个线程中进行共享,不存在线程不安全的情况,更像NIO模式==SpringBoot 2.0之后默认采用lettuce==源码:public class RedisAutoConfiguration { @Bean @ConditionalOnMissingBean(name = "redisTemplate") //可以自定义redisTemplate @ConditionalOnSingleCandidate(RedisConnectionFactory.class) public RedisTemplate<Object, Object> redisTemplate(RedisConnectionFactory redisConnectionFactory) { //默认的RedisTemplate没有过多的设置,redis对象都需要序列化 //两个泛型都是<Object,Object>,使用时需要强转为<String,Object> RedisTemplate<Object, Object> template = new RedisTemplate<>(); template.setConnectionFactory(redisConnectionFactory); return template; } @Bean @ConditionalOnMissingBean //由于String是redis中的常用类型,所以将其单独列出注册到Spring容器中 @ConditionalOnSingleCandidate(RedisConnectionFactory.class) public StringRedisTemplate stringRedisTemplate(RedisConnectionFactory redisConnectionFactory) { StringRedisTemplate template = new StringRedisTemplate(); template.setConnectionFactory(redisConnectionFactory); return template; }自定义RedisTemplatepackage com.sw.config; import com.fasterxml.jackson.annotation.JsonAutoDetect; import com.fasterxml.jackson.annotation.PropertyAccessor; import com.fasterxml.jackson.databind.ObjectMapper; import org.springframework.context.annotation.Bean; import org.springframework.context.annotation.Configuration; import org.springframework.data.redis.connection.RedisConnectionFactory; import org.springframework.data.redis.core.RedisTemplate; import org.springframework.data.redis.serializer.Jackson2JsonRedisSerializer; import org.springframework.data.redis.serializer.StringRedisSerializer; /** * @Author suaxi * @Date 2021/1/2 14:24 */ @Configuration public class RedisConfig { //自定义RedisTemplate @Bean @SuppressWarnings("all") public RedisTemplate<String, Object> redisTemplate(RedisConnectionFactory factory) { RedisTemplate<String, Object> template = new RedisTemplate<>(); template.setConnectionFactory(factory); //Json序列化配置 Jackson2JsonRedisSerializer jackson2JsonRedisSerializer = new Jackson2JsonRedisSerializer(Object.class); ObjectMapper om = new ObjectMapper(); om.setVisibility(PropertyAccessor.ALL, JsonAutoDetect.Visibility.ANY); om.enableDefaultTyping(ObjectMapper.DefaultTyping.NON_FINAL); jackson2JsonRedisSerializer.setObjectMapper(om); //String序列化 StringRedisSerializer stringRedisSerializer = new StringRedisSerializer(); //key采用String的形式序列化 template.setKeySerializer(stringRedisSerializer); //hash采用String的形式序列化 template.setHashKeySerializer(stringRedisSerializer); //value序列化方式采用jackson template.setValueSerializer(jackson2JsonRedisSerializer); //hash的value序列化方式采用jackson template.setHashValueSerializer(jackson2JsonRedisSerializer); template.afterPropertiesSet(); return template; } }
-
Jedis Redis官方推荐的Java开发连接工具导入依赖:<dependency> <groupId>redis.clients</groupId> <artifactId>jedis</artifactId> <version>3.2.0</version> </dependency>测试类:package com.sw; import redis.clients.jedis.Jedis; /** * @Author suaxi * @Date 2021/1/2 11:40 */ public class TestPing { public static void main(String[] args) { Jedis jedis = new Jedis("服务器IP地址", 6379); jedis.auth("密码"); System.out.println(jedis.ping()); //PONG } } 注:SpringBoot 2.0之后默认采用lettuce
-
Redis基本事务操作 关系型数据库:ACID原则非关系型数据库:Redis事务是一组命令的集合,一个事务中的所有命令都会被序列化,在事务执行的过程中顺序执行(一次性、顺序性、排他性)redis的单条命令是保证原子性的,但事务不保证原子性事务中所有的命令并没有被直接执行,只有发起执行命令(Exec)时才会执行redis的事务:开启事务(multi)命令入队执行事务(exec)正常执行事务127.0.0.1:6379> MULTI #开启事务 OK 127.0.0.1:6379> set key01 hello #命令入队 QUEUED 127.0.0.1:6379> set key02 nihao QUEUED 127.0.0.1:6379> get key01 QUEUED 127.0.0.1:6379> set key03 xiexie QUEUED 127.0.0.1:6379> EXEC #执行事务 1) OK 2) OK 3) "hello" 4) OK 127.0.0.1:6379> 取消事务127.0.0.1:6379> MULTI #开启事务 OK 127.0.0.1:6379> set key01 hello QUEUED 127.0.0.1:6379> set key02 nihao QUEUED 127.0.0.1:6379> set key03 xiexie QUEUED 127.0.0.1:6379> DISCARD #取消事务 OK 127.0.0.1:6379> get key03 #事务队列中的命令都不会被执行,此处查询结果为空 (nil) 127.0.0.1:6379> 编译型异常(代码中存在错误),事务中的所有命令都不会被执行127.0.0.1:6379> MULTI #开启事务 OK 127.0.0.1:6379> set k1 v1 QUEUED 127.0.0.1:6379> set k2 v2 QUEUED 127.0.0.1:6379> getset k3 (error) ERR wrong number of arguments for 'getset' command 127.0.0.1:6379> set k4 v4 QUEUED 127.0.0.1:6379> EXEC #执行事务报错 (error) EXECABORT Transaction discarded because of previous errors. 127.0.0.1:6379> get k1 #事务队列中的所有命令都没有被执行 (nil) 127.0.0.1:6379> 运行时异常(1/0问题),事务队列中除有问题的语句外其他的都会被执行(无原子性)127.0.0.1:6379> set k1 hello OK 127.0.0.1:6379> MULTI OK 127.0.0.1:6379> INCR k1 #字符串不能自增 QUEUED 127.0.0.1:6379> set k2 v2 QUEUED 127.0.0.1:6379> set k3 v3 QUEUED 127.0.0.1:6379> get k3 QUEUED 127.0.0.1:6379> EXEC 1) (error) ERR value is not an integer or out of range #自增语句执行失败,其后的语句执行成功 2) OK 3) OK 4) "v3" 127.0.0.1:6379> get k2 "v2" 127.0.0.1:6379> get k3 "v3" 127.0.0.1:6379> Watch监控悲观锁:认为什么时候都会出现问题,无论做什么都会加锁乐观锁:认为什么时候都不会出现问题,不会上锁,在更新数据的时候会去判断在此期间是否有人修改过数据获取version更新的时候比较versionRedis监视测试:# 正常执行 127.0.0.1:6379> set money 100 OK 127.0.0.1:6379> set out 0 OK 127.0.0.1:6379> watch money OK 127.0.0.1:6379> MULTI OK 127.0.0.1:6379> DECRBY money 20 QUEUED 127.0.0.1:6379> INCRBY out 20 QUEUED 127.0.0.1:6379> EXEC 1) (integer) 80 2) (integer) 20 127.0.0.1:6379> 乐观锁:(常用于电商秒杀系统)127.0.0.1:6379> WATCH money #监视money OK 127.0.0.1:6379> MULTI OK 127.0.0.1:6379> DECRBY money 10 QUEUED 127.0.0.1:6379> INCRBY out 10 QUEUED 127.0.0.1:6379> EXEC #在执行之前有其他的线程修改了money,会导致这里的事务执行失败 (nil) 127.0.0.1:6379> 127.0.0.1:6379> UNWATCH #如果发现事务执行失败,就先解锁 OK 127.0.0.1:6379> watch money #再次监控,获取最新的值 OK 127.0.0.1:6379> MULTI OK 127.0.0.1:6379> DECRBY money 10 QUEUED 127.0.0.1:6379> INCRBY money 5 QUEUED 127.0.0.1:6379> exec #对比监控的信息是否发生了变化,如果没有,则执行成功,否则执行失败 1) (integer) 0 2) (integer) 5 127.0.0.1:6379>